
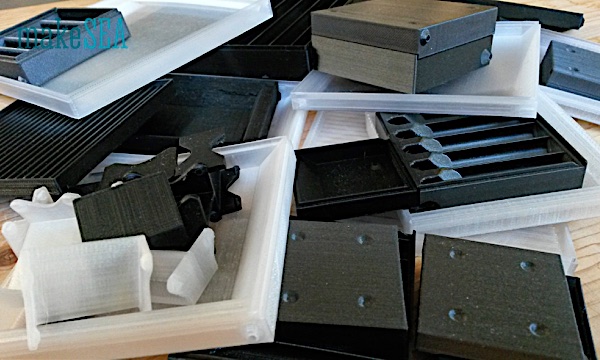
FrontPage
makeSEA Solar Water Distiller
makeSEA Solar Water Distiller
Idea / Requirements
Design a 3d-printable system which can clean polluted water.
There are systems, where the water is initially cleaned with some kind of natural filter consisting of pebbbles, sand, and charcoal (https://en.wikipedia.org/wiki/Biosand_filter). In DIY-projects people use PET-bottles as a container/funnel containing these natural ingredients. However this filter can’t remove dissolvable contamination like salt. For eliminating the salt, reverse osmosis water filters are used (https://en.wikipedia.org/wiki/Reverse_osmosis). The de-salting filter requires a membrane with tiny pores, and very high water pressure.
Since PET bottles are even easier available than 3d-printed funnels, and any trivial 3d-printed container couldn’t withstand the required pressure for reverse osmosis, I decided to not go in this direction. A solar water distiller seems to be much better choice, and 3d-printable.
Concept: Solar Water Distiller
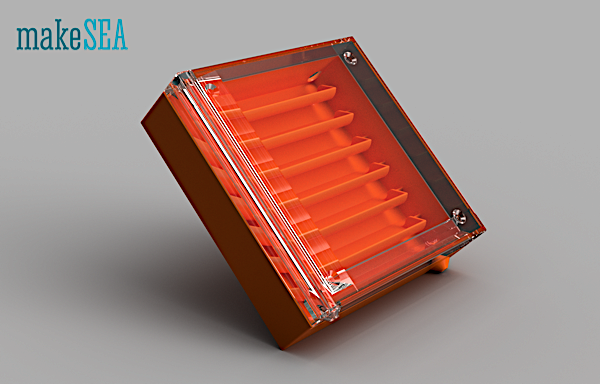
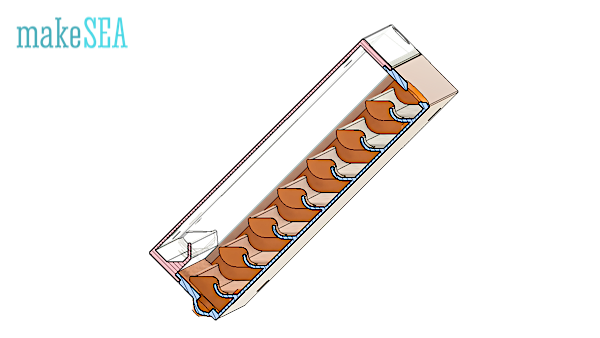
A box with a transparent lid and a black base.
The base consists of an array of basins which are filled with polluted water. The sun shines through the lid and heats up the water and the air inside the box. The water evaporates, it can’t escape the box, humidity reaches 100%. Since the lid has a lower temperature (environment temperature), the vapor will condensate and build water droplets at the inside surface of the lid. The surface of the lid is tilted, and condensated water droplets are collected in a channel at the bottom edge of the lid.
Contamination particles, and salt will remain in the basins - distilled Water is clean (mostly, see https://en.wikipedia.org/wiki/Solar_still). After a while, the basins need to be flushed out for cleaning.
Implementation
The larger the area shone from the sun, the more water can be distilled. Ideally the area is ½ square Meter or more in order to have a considerable amount of water cleaned per day. Because 3d-printing volume is much more limited, I’m designing tiles, which can be clipped together.
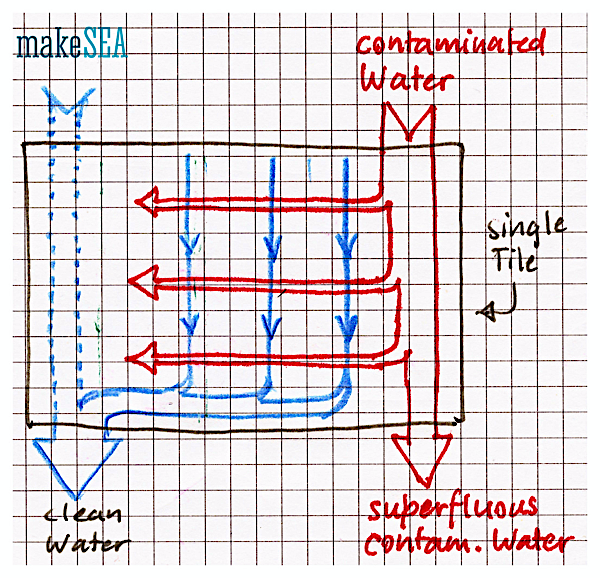
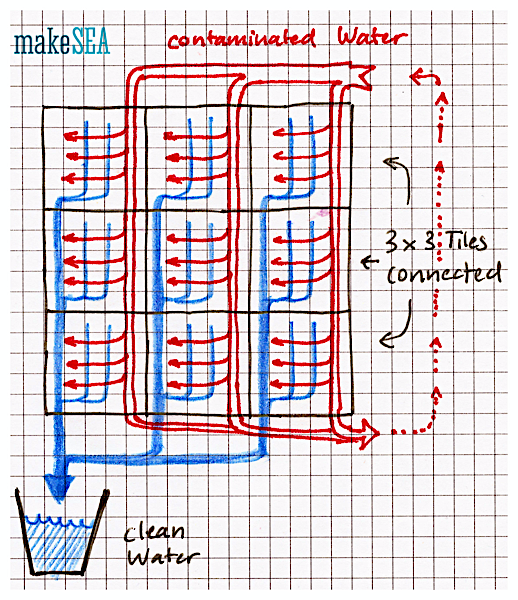
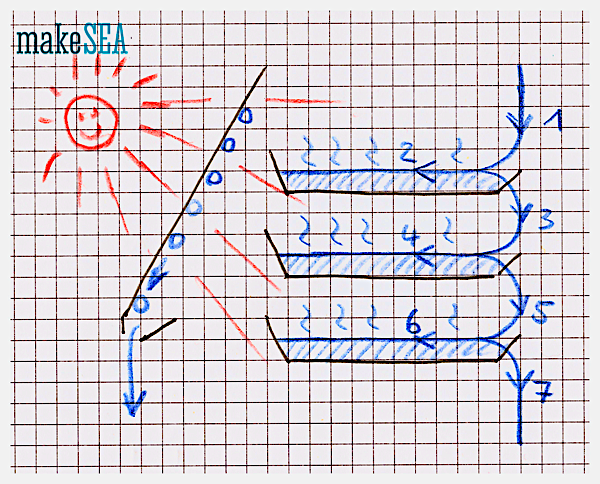
Water enters from the top into vertical channels. Clean water and superfluous water exit at the bottom, and it can enter to the next row of tiles. Superfluous contaminated water maybe is returned to the input of the system./p>
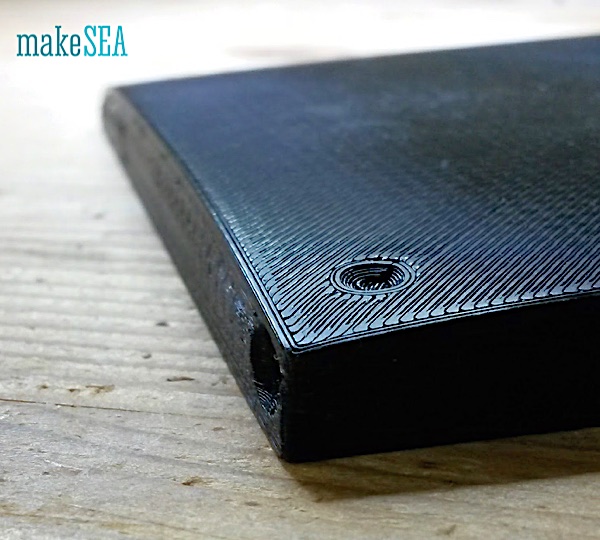
A single tile has multiple basins in order to enlarge the water surface area, and increase the amount of vaporizing water. Another reason of these basins is the reduction of flow: it would be bad, if water circulates through the basins (meander), because the warm water would flow away. Therefore the basins are dead-ends for the water, and water can heat up.
Each basin has a slightly lower overflow edge on one side of the base tile. As soon as to top basin is full, the overflowing water fills the basin below. The droplets of the distilled water flow along the lid into a horizontal channel at the bottom of the tile, which guides the clean water to the very left. Then it is guided into the main channel for collecting the water of multiple tiles. The angle is 45° (the limit for 3d-printing overhanging structures).
3d-Printing
The illustration below shows, how the individual parts are orientated for 3d-printing. The transparent lid is oriented vertically with the channel on top, the black base is laid flat to the build plate. For connecting the tiles there are different types of clips (corner, side, horizontal or vertical inner side). Depending on the number of tiles, different amounts of types of clips are needed (like a puzzle).
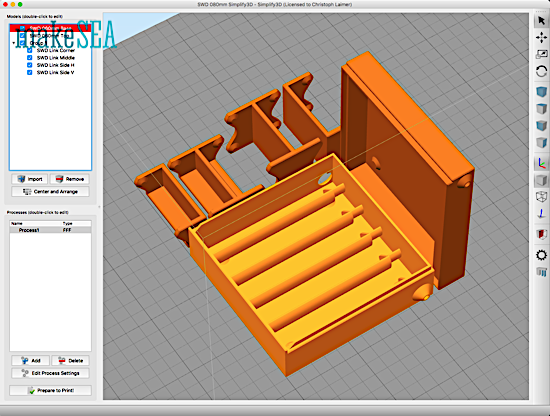
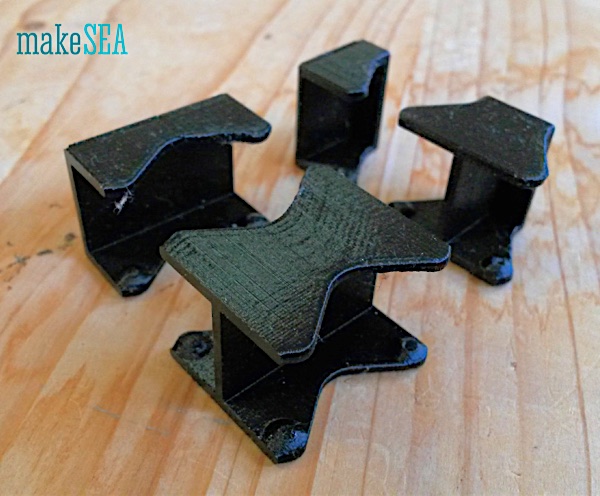
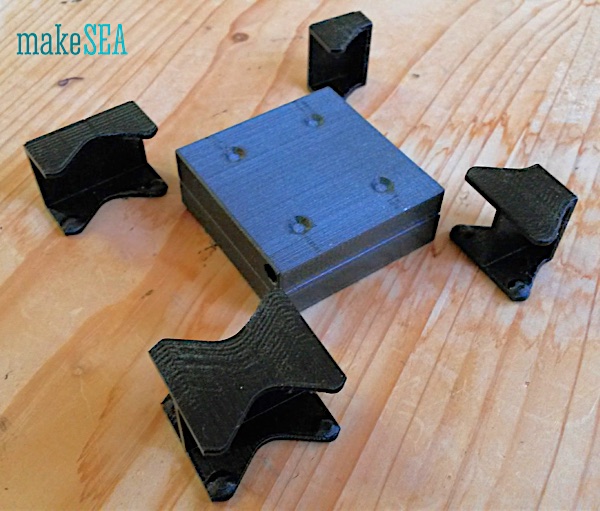
The clips hold lid and base together (the lid in the illustration above isn’t transparent, because I didn’t want to change filament for 3d-printing all the time, when I developed and tested the clips).
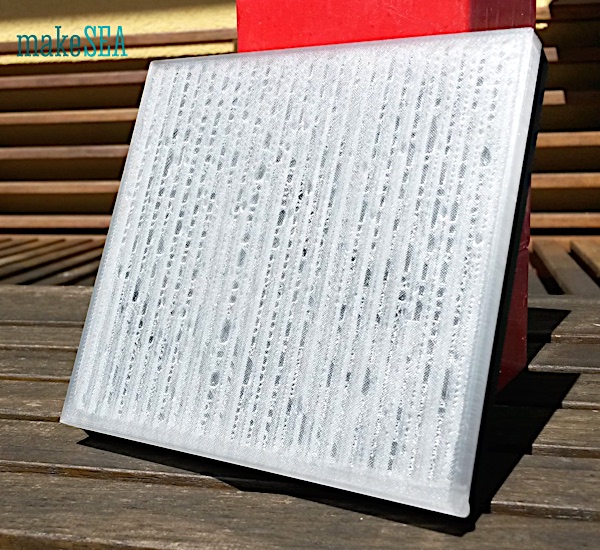
Distilling Test
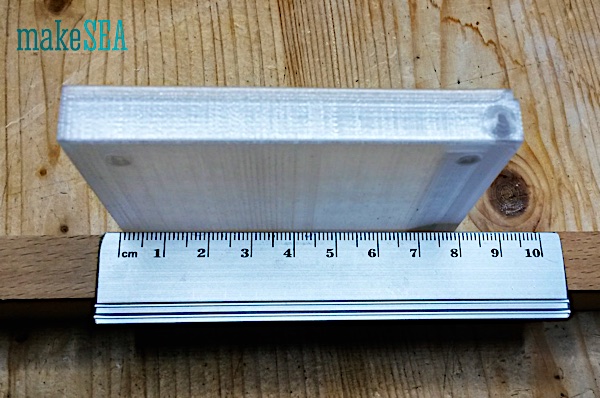
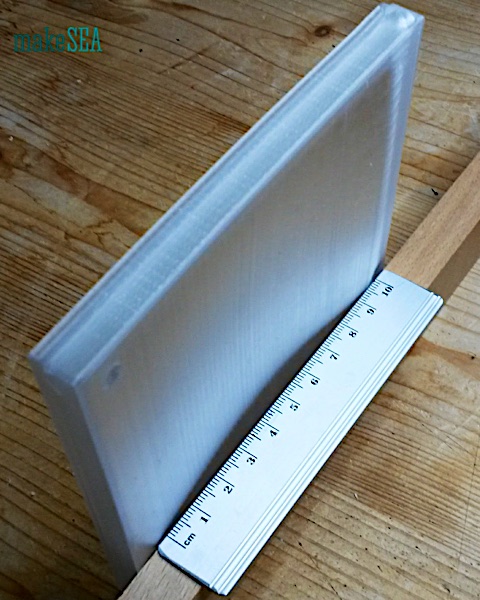
As an early proof of the concept I’ve 3d-printed the lid with transparent PETG and the base with black PLA (the type of plastic is less important than the color). The pictures (and the video) demonstrate, that the principle works. Initially the lid was completely dry, and after a while droplets appeared, and as they got bigger, they did flow into the base channel.

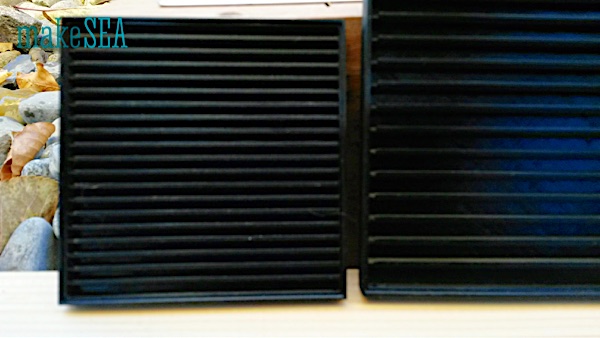
Testing the Basin Size
Initially I was thinking, that small basins would be a great idea in order to increase the surface area. But it turned out, that the surface tension of water has a disturbing influence on the desired flow of water. Basins must have a minimum size. For experimenting I created tiles with different sizes. The smallest on the left is 80 mm wide, the middle is 100 mm, and the large on the right is 120 mm. Also the number of basins were different. These tests showed that the minimum distance between the basins needs to be 12 mm in order to have a proper flow of water.
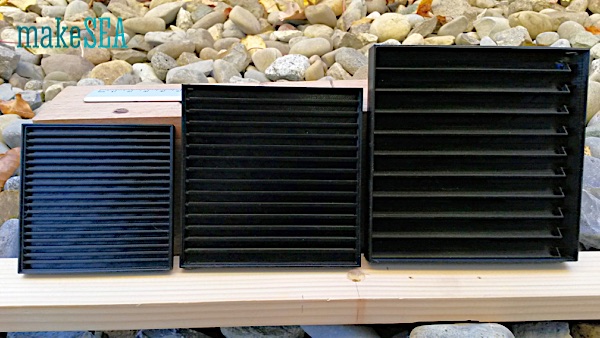
For each of the tiles above there is a short video illustrating the flow.

Issues with 3d-Printing
The lid must be printed with the orientation of the 3d-printed layers along the flow of the condensated water droplets. With wrongly oriented printed rills, the droplets would probably not flow into the collecting channel at the bottom, but they would fall back into the basins with the polluted water.
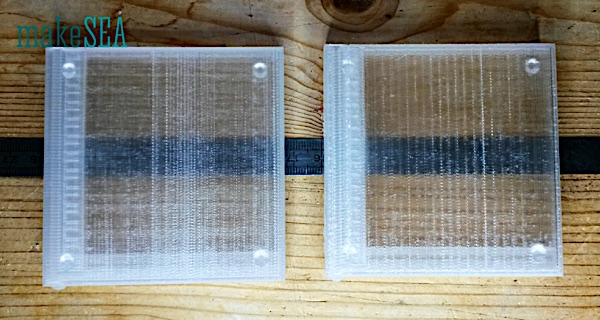
The image below shows the transparency with different print-settings. The two versions of the lid have different layer height, material flow-rate, and retraction settings. Influence of the parameters seem to be quite random - I shouldn’t have changed that much parameters at one. Certainly more work to-do for optimizing the transparency.
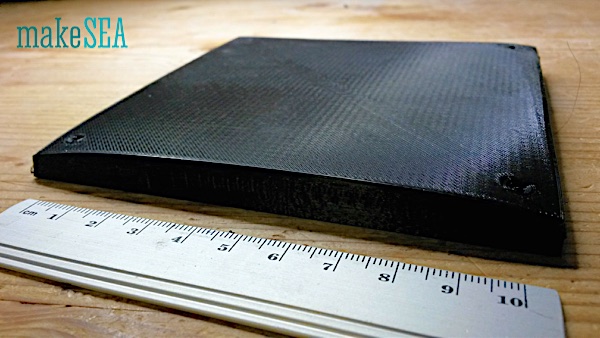
A much more relevant issue is warping. While the printing orientation is ideal for printing several lids at once, the large area is distorted, and the region of the 45° overhanging tile-channel is causing another bad warping effect. Mainly the outer surface is affected, but also the sealing edge to the base isn’t as straight as required. The effect gets worse the larger the tile size. In my tests only the 80 mm tiles were enough accurate. A small tile size has the disadvantage of many tile connections, and a reduces area for condensation (some area is wasted by channels and borders).
It also happened that there were bed-adhesion issues when printing the base tile. This problem is probably not very difficult to resolve. However the flat printing orientation has the disadvantage, that only one tile can be printed at once, and the operator has to more often start the printing. It would be better, if base tiles were designed in a way, where it was possible to print them upright (like the lids). Four or maybe even nine tiles could be printed in one pass (over night).
Also important: the tile-base needs to be watertight. It happened that I left a tile filled with water on my wooden table. After a while it was empty, and the table was wet. 100% infill for 3d-printing isn’t enough. Maybe the upright orientation like for the lid was even better than the horizontal plane of rectilinear crossing lines?
So far I only managed to print working tiles with 80 mm length. For an area of ½ m^2 there would be 78 tiles needed. With 120 mm tile size there are only 35 tiles needed. 160 mm tiles would be great!
Conclusion / To Do
- Test if connection/funnel between neighboring tiles are not leaking
- Increase tile size to 160mm, printable upright without warping
- Design water inlet distribution pipe • Design water outlet collection pipe
- Design water inlet flow speed control
- Design clips with a screw hole (fixing all the tiles on a board)
- Test assembly and disassembly when a cleaning service is needed. How much time is needed for a cleaning service?
Anyway this simple box isn’t as simple as I initially thought. The large size, and the flow of water are a big challenge. I’ve spent quite some effort in different shapes of basins and printed tons of boxes in various sizes. I’m still not happy with the result.
Solar Water Distiller Related videos:
https://youtu.be/fxg6duTaejE
https://youtu.be/m9kCWXurvW0
https://youtu.be/Yv0XIc5oUWY
Download the Files for this Project
at the Mash Market HERE
27582 Views
Pictures and video don't convert like first-hand experience does.
Research shows that using augmented (AR), and virtual reality (VR), is more compelling and more likely to persuade your audience to buy, learn, and understand what you have to share. Use makeSEA to deliver content that connects with your audience like no other medium can.
Compel your audience with

Content Management and Cross-Platform Collaboration
for Augmented and Virtual Reality
The fastest way to organize and share your content as if you are together with your audience in real life and keep it fresh using next-generation virtual and augmented reality technology.


It's time to change the way you communicate, collaborate and compel your audience.
Time to change the way you capture and curate evolving ideas.
Use makeSEA content management platform + Catapult, our cross-platform client app for mixed reality and spatial collaboration to share your vision and inspire your audience with content that you are already producing.
10X-100X Time Savings • Recyclable Content & Scenes
Use makeSEA to reduce your AR and VR production time by an order of magnitude, or two.
Blend content from multiple sources tell a better story: 3D models, real-world scans, video, and you!
Keep things fresh and relevant and improve experiences over time as your content and XR technology mature.
Enabling augmented reality, mixed reality and spatial computing for everyday use.SM
Catapult your vision, in real-time together, for FREE.
It's as easy as a social media post:
-
Create an account, start a project and upload your content from most any content source1.
-
Launch Catapult, makeSEA's mixed reality client app on your VR or AR compatible device2.
-
Share and collaborate using your own spatial content, with others together in real-time, in the same physical space and remotely.
Click Here to Get Detailed Instructions, Download and Install
Try makeSEA now! Simply register here and start publishing.
makeSEA is also available as a privately branded (white-label), or custom integrated solution for enterprise. Please Contact Us for more information.
for Architecture
& Design
& Design
Magic Leap &
AR/Mixed Reality
Content Publishing
AR/Mixed Reality
Content Publishing
for Education
& Making
& Making
for Construction
for Trade Shows
& Exhibits
& Exhibits
for Retail
& Branding
& Branding
1:Catapult supports assets saved in GLB (preferred), FBX, OBJ, STL or MP4 (standard 720p, 1080p, or 3K 360˚ spherical surround format), or a makeScene package for live over-the-air collaboration with shared spatial content. See the how-to guide for hints and instructions on how to easily export or convert content from most 3D authoring tools and platforms. 2:makeSEA supports Oculus Quest 2, Magic Leap 1, and Microsoft Hololens 2, makeSEA for Enterprise supports additional client devices; contact us for more information.
 Trade Show Alternative
Is your tradeshow game plan caput because of COVID? Ours is! It's OK: use makeSEA and MagicLeap for Trade Shows and Exhibits to put your full-scale booth — that you host live and your...
Free makeSEA Account & Catapult App
makeSEA user accounts and Catapult for spatial computing have always been free. Covid-19 is changing the way we work, collaborate, interact and learn forever. It is accelerating the shift to...
Where Do We Go from Here?
I think we all have to accept that part of today's normal will become the "new" normal. At any time, another pandemic or other crisis can and probably will affect the way we teach, learn,...
Doing our part to help with local PPE
Doing our part to help with local PPE needs using hashtag # makeSEA hashtag # Catapult and hashtag # MagicLeap for rapid iteration and visualization on 3D printed...
Additive Manufacturing, AR and COVID-19
The global manufacturing industry is reeling from the effects of the COVID-19 outbreak. The mega-factories we rely on are experiencing shortages of personnel and raw materials for production....
Adapting to the New Normal
We are entering a new era. Whether you are a business, in the education field or just looking for ways to communicate safely, we are being forced to accept that we all need to find ways to...
Feeling Like a Fish Out of Water
During this time of uncertainty, we're all feeling a little like a fish out of water. Looking for new ways to conduct business, educate and train, share information and collaborate with...
Look to the Future with Spatial Computing
Now more than ever we need to think about keeping organizations running smoothly in a crisis. We are all being challenged and forced to look at the future. Businesses, educational...
Use Catapult for Forensic Visualization
What can you do with makeSEA and Catapult for Magic Leap? How about forensic visualization. Imagine being able to securely convert and deliver forensic scans data to full-scale immersive...
makeSEA is More
makeSEA is busy printing masks to help with the Coronavirus crisis. makeSEA's core value starting out was to support independent 3D designers, maker spaces and education with a platform that...
Change How You Communicate and Collaborate
It's time to change the way you think about collaborating, communicating, teaching, and design. Time to change the way you capture and curate evolving ideas. Use https://makeSEA.com + ...
makeSEA Catapult App launched on Magic Leap World
It's time to change the way you think about communicating, teaching, and design. Time to change the way you capture and curate evolving ideas. Use makeSEA + Catapult and Magic Leap...
makeSEA at Construct 3D Conference
Look for us at the Construct 3D Conference between February 13-16 at Rice University in Houston, Texas. We’ll be joining an awesome list of sponsors and exhibitors and hope to see many of you...
Positive ROI with the Use of Mixed Reality
Mixed Reality (MR) is an umbrella term given to computer-generated environments that either merge the physical and virtual worlds (AR) or create an entirely immersive experience (VR) for the...
How Technology is Impacting Education...In a Good Way
Today’s students have been raised on digital devices—digital engagement is a part of their DNA. It seems like a “no-brainer “ that instructors, especially at the high school and...
Easy Augmented Reality
makesea for Augmented Reality (AR) is a SaaS that supports a number of verticals and at the core is a content management platform that can be dressed for any experience from consumer branding...
AR and 3D Printing Should be Part of Advanced Curriculums
makeSEA for Education provides a safe, secure environment for students to collaborate and iterate on 3D designs and projects. Our SaaS platform also offers a way to get started with Augmented...
Using AR for EDU
It’s no secret that keeping the attention of today’s students is harder than ever. From grade school to college level, these students have been raised with...
Some AR Stats to Think About
Download the infographic . If you think Augmented Reality/Mixed Reality is still just something to think about, think again! This technology is being used in everyday businesses...
A picture is worth a thousand words
Sometimes a picture IS worth a thousand words. makeSEA can get your firm AR ready. Have you considered how Augmented reality (AR) could help your architecture or construction firm? ...