
FrontPage
How To & Tips and Tricks
Catapult Version 3 for Augmented and Virtual Reality (AR/VR/XR)
Sharing & Collaboration is Here and You Can Use It for FREE!
Simply create an account and share, no commitment is required.
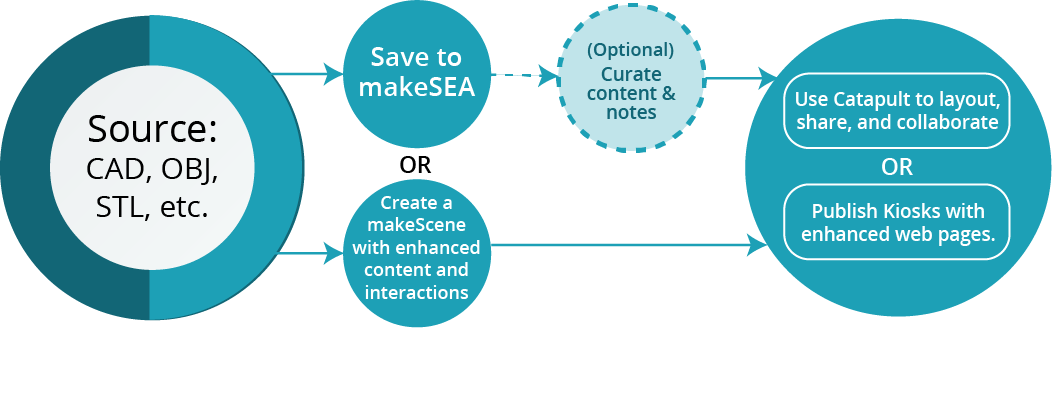
Catapult lets you share your makeSEA Project content with others, together, as if in real-life. You can mix 3D models and designs, real world "digital twin" captures from iOS and LIDAR devices, and 2D and 360 surround video.
Host your audience live, or leave them a space to explore on their own
Once you upload your content you can place, scale and save the assets in the project space for others to see. Objects can be small, e.g. table-sized, or world-sized like the inside of a building, facility, or machine, etc.
Mix and match your content to tell a story, teach a lesson, demonstrate a product or influence your audience. Take them anywhere and show them anything you can imagine as if it is first-hand experience.
Dowload & Installation Instructions
Magic Leap 1:
Launch Magic Leap World on your device to install Catapult
You can find Catapult by searching for "Catapult" or "makeSEA" in Magic Leap World on your Magic Leap device. If you do not see it listed, please be sure your Magic Leap user account Region preferences are set at https://id.magicleap.com. Magic leap recently updated their policies so that your Region must be set to see all available apps.
Microsoft Hololens (1 & 2):
Click to Download Here
(BETA) Available for sideload installation
Oculus Quest (1 & 2):
Click to Download Here
Available for sideload installation
Contact Us to request a personal demonstration or call 800-803-1050.
Now publish your vision - It's as easy as a social media post:
-
Create an account, start a project and upload your content from most any content source.
-
Launch Catapult, makeSEA's mixed reality client app on your VR or AR compatible device.
-
Share and collaborate using your own spatial content, with others together in real-time, in the same physical space and remotely.
Watch & Learn with a direct guided lesson from Stavie - Chief Maker at makeSEA
Latest Feature Update 4/22/21 Catapult v.3.0c:
Catapult Version 3.0c Release Notes
4/28/21 Oculus (3.1c)
Improved multi-page bookshelf and cross-device pagination handling.
4/3/21
Improved project loading and list caching:
for faster navigation and loading of large project list sets.
Advanced makeScene package APIs added:
cross platform support for Magic Leap, Hololens, and Oculus
Native Control interfaces added for all devices (works in addition to Catapult native controls)
Improved autoplay content handling:
for surround video and makeScene packages
Improved keyboard layout and useability
Great Feautures from Past Releases!
What can you do with makeSEA + Catapult? We have added tons of new Example scenes to help spark your imagination. Go to Examples under the main menu in Catapult for some fabulous demonstrations of what you can do with user generated content from most any 3D authoring source. Examples include use cases for architecture and construction, education, engineering, consumer branding and marketing, crime scene investigation, support and training, trade shows and events, remote collaboration and co-presence, CAD, 3D repository, Matterport, and LIDAR sourced content, and more. Join with a friend to get the full benefit. Remember, these Examples are public community spaces: please, play nice with others.
Save your work:
The layout and placement of assets in the Project collaboration space can be saved by the Master of Ceremonies. Participants joining or returning to the space can choose to restore the layout to the last saved state for all placed and scaled objects. This is perfect for staging and dressing any space for others to visit, any time in the future: for education, demonstration and training, creative, or marketing purposes, etc. An option to periodically auto-save the layout is available in menu under General Settings. Just upload your content, join Catapult and layout your space, and save it for reuse. Done!
Blow stuff up!
Objects with multiple layers can now be exploded (expanded into their constituent parts - not a fiery explosion), by using the laser to shoot the "Explode" button displayed above the object: hold the Trigger to expand, release to stop. Depending on the source file, individual parts can be manipulated by placing your Control inside the part, pulling and holding the Trigger, and dragging the part; let go of the Trigger to release the object. Shoot the "Return" button to reset the object to its original state.
Labels and Descriptions:
Assets now display label names and description details. Asset names are derived from the asset Title, as stored in makeSEA, without the file name extension (e.g., ".glb"). Clicking on the label will toggle the display of the details for the asset if they exist in the asset's record in makeSEA. The sub-part names are displayed when the object is Exploded. The sub-part names are derived from the name of the part as stored in the asset file, itself. For example: if you have an asset with the name "Wind Turbine.glb", which has sub-parts in the model, the label for the asset will be displayed as "Wind Turbine". Clicking on the label will toggle the display of the detailed description for the asset, if it exists. If the asset has parts embedded, like "propeller" for example, the name of each part will be displayed when the asset is Exploded, and the details will fade away.
Livestream Video support is here!
You can use makeSEA's Remote Presence workflow and video streaming services along with Catapult spatial collaboration and a 360 surround camera to produce realtime remote co-presence/remote hands support for any location. DASH (.mpd indexed), and HLS (.mu38 indexed) livestream video in screen and 360 surround format is now supported by adding a Remote Asset to the Project that points to the livestream source and is designated with the string "livestream"or "livestream_360" or livestream_autoplay_360 in the Description field when creating the Remote Asset link. The option to play the video is listed under the Catapult menu along with any other video assets available in the active Project collaboration space that you are in. Designating 'livestream_autoplay_360" in the Remote Asset Description will cause the livestream surround video to begin playing automatically when a user joins the space.
360 surround video auto-play is now supported
The first listed video for any project ending in "_autoplay_360.mp4" will automatically play when a user joins the project collaboration space. This is great for setting a mood, giving the participants context, or as ambient content for mood or effect.
Support for collaborative measuring added
Look for the tape measure tool icon under General Settings. Select the icon with the laser and pull the trigger to place a tape measure in the collaboration space. The tape can be moved by grabbing the center of the tape tool, or by moving the end points by placing your Control inside the ball at either end, holding the Control Trigger, and dragging. Release the Trigger to place each end point at each end of the desired location to measure. The endpoints can also be manipulated by looking at them and using the Control Pad gestures to move the endpoint from a distance. The length of the tape is indicated above the line towards the center. It can also be used as a trajectory marker. You can use multiple tape measures. All participants see the tape measure and resulting measurement.
Bug Fixes:
This release fixes a bug where screen-based video cannot be deleted from a scene because the "X" is missing from the screen corner.
This release includes numerous minor improvements to performance, stability and usability.
Quick Start Guide:
Catapult for makeSEA allows anyone to share and collaborate live in AR and VR using 3D content produced by most 3D design platforms, real-world scans, surround video and more. Publishing and updating content in a makeSEA project is as easy as:
1. Create a Project at makeSEA.com
2. Export any 3D content in GLB, OBJ, FBX, STL (or MP4 video) format and add it to your Project's Assets collection
3. Add Team Members and set your preferred sharing mode: Private, Public, etc. (IMPORTANT Team members can't see assets in Draft mode.)
4. Launch Catapult (this application), login with your makeSEA credentials
Choose a Project to join a common collaboration space. Only Team Members can join Projects marked Private.
Basic Controls:
Conjure Settings by pressing the Home button on the Control. Click the gear to fix the settings in place.
Press the bumper to toggle your shared laser.
You will be prompted to anchor your environment before proceeding. The head of the virtual conference table serves as the anchor. An invisible, paginated "bookshelf" of viewable objects will appear to the right of the head of the table.
All participants can manipulate the objects in the scene. Here are two basic methods:
1. Place your Control inside the object, pull-and-hold the trigger, and drag the object to a desired location. Release the trigger to leave the object where placed.
OR
2. Focus your eyes on the object you wish to move. Use the Control touchpad to articulate the object:
- press up/down to push/pull the object
- press left/right to move the object side to side
- swipe up/down to move up/down
- make a circle gesture to rotate
- swipe left/right to shrink/enlarge
Detailed Instructions
1. Create your account (it's FREE!)
click to expand or collapse
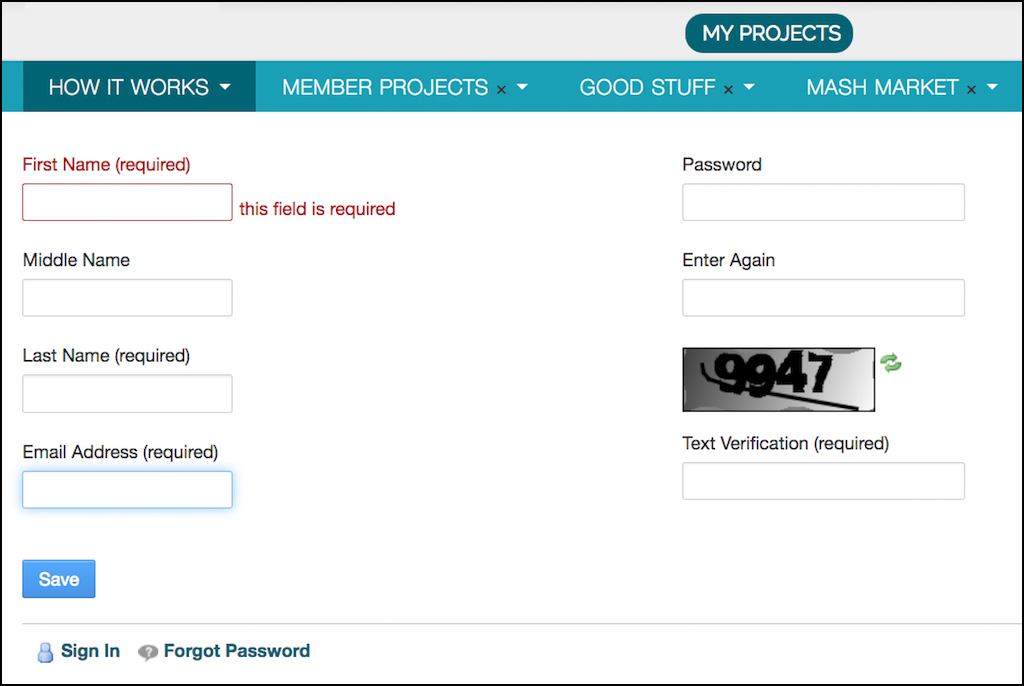
First create an account. Click on the Register Free link at the top of any page.

After you click on the link you will be taken to this page where you can register as a member. Fill out the information requested and create a password.
2. Create a Project
click to expand or collapse
Before creating a project, we encourage you to browse the other projects that people have created to get a sense to how your project will look when you finish and publish it.
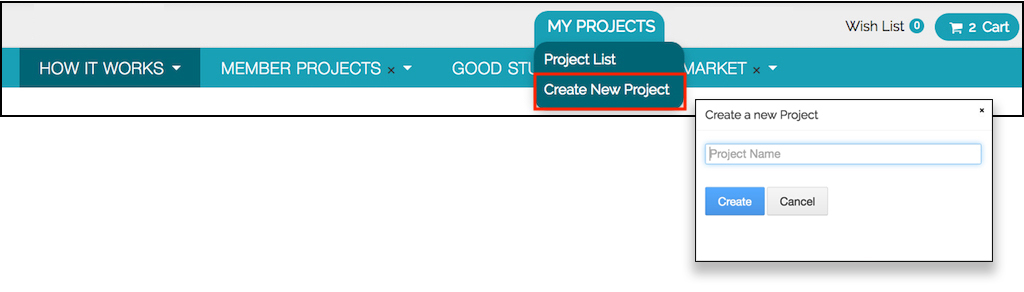
Once you have established an account, there are a couple of ways to start a new project.
Sign in. Hover over the My Projects tab and click on Create New Project. This prompts a pop up for you to create a name for your new project, then takes you to the page where you will be able to upload everything to your project.
The other way to create a new project is to hover over My Projects and click on the Project List.

The Project List will redirect you to a page with a list of all of your projects (see below). NOTE: If you are new to the system, there will not be anything in your project list. After creating projects you will be able to see all of them on this page. This page also shows the create date, last modified date and the short URL for your projects.
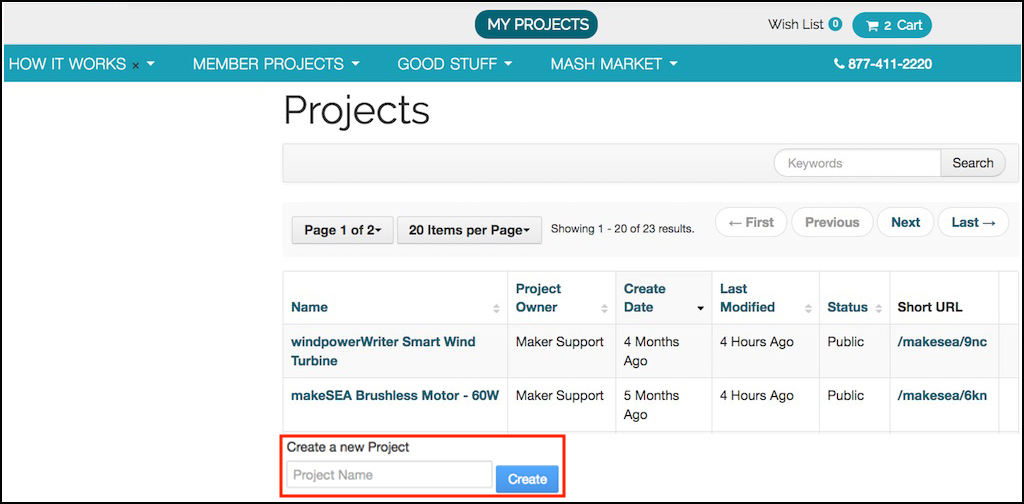
At the bottom of the page you can create a new project. Name your project, then hit create. The name of your new project will now show up in your list of projects. Click on the project name and it will redirect you to your project page for the new project. If you already have a Project List you may use this link to access all your projects.
3. Setting up your Project page
click to expand or collapse
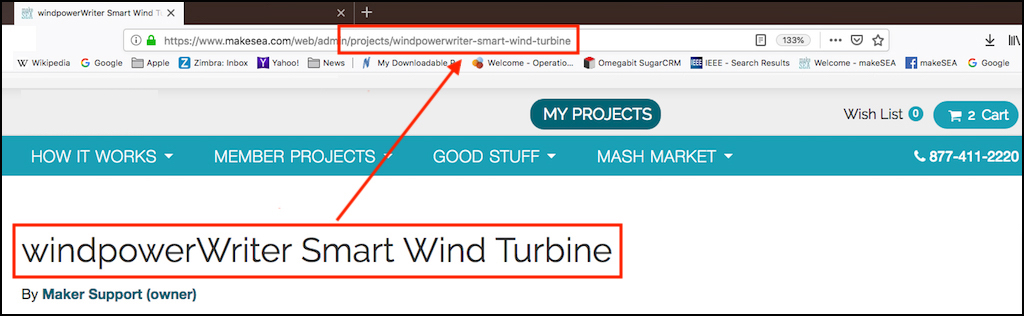
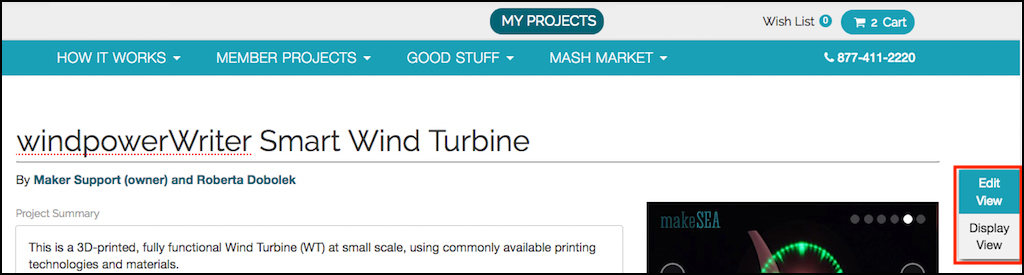
THE URL
The first item you should notice when you arrive at your project page is that the title of the project is directly linked to the URL. If you change the title of your project at a later time a prompt will pop up and remind you that the URL will change with the title. If you have shared this URL, remember to update the person(s) or site(s) with the new URL. The old URL will go to a page not found.
EDIT VIEW and DISPLAY VIEW
When you are setting up a project you must be in the Edit View to change or add text, photos or assets. The Display View will show you how your project will display once it is published.
THE CONTENT EDITOR TOOLBAR
When in the Edit View on your project page, both the Project Summary Area and the Project Detail Area have a pop-up Content Editor Toolbar which displays when you click into either box.
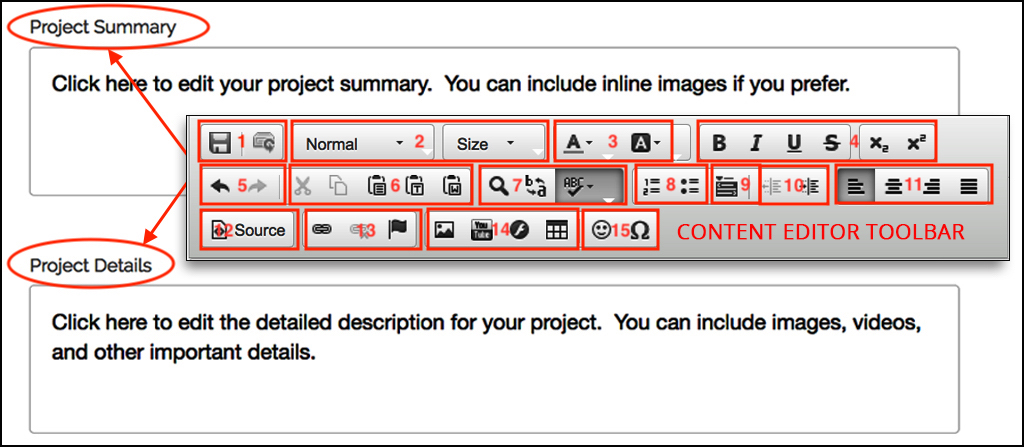
Some functions of the Content Editor Toolbar:
- Save changes as you edit or restore original content
- Choose text as heading or regular text and specify size
- Choose text color or background color
- Choose text style
- Undo and redo
- Basic cut, copy, paste functions
- Search, replace, spell check
- Insert lists
- Collapsible Content (see below)
- Indent
- Alignment of text
- Source - this tool is useful for those who know html code. Click here to edit in the Source Code. Using this tool you can toggle between the text box and the source code.
- Insert a hyperlink, highlight the text and click on this symbol to add the link; add an anchor to your text
- Add a picture, add YouTube video, Insert a video using flash, add a table
- Add emoji or special character
ADDING A PROJECT SUMMARY
As always, be sure you are in the Edit View before adding a summary. The summary is the description that appears next to your main image when people are looking through all of the projects. The summary should briefly describe what your project is. When you type in the summary box the content will remain in draft mode (indicated by the draft background text) until you click on the SAVE icon (#1 above) in the Content Editor. Although it is possible to, it is not recommended that you include "inline images" in the summary section. Including inline images at this stage will affect the thumbnail image that appears on the list of projects.
After you save the content ion the Project Summary box, switch to the display view and check to make sure your text is there. Remember, you can edit your content at any time by logging into the system and navigating to your project.
ADDING PROJECT DETAILS
Project Details is meant to be a running journal on the project. Add to and edit this content as you progress with your project. This area can include any data, descriptions, and photos relevant to the project. This could be anything from the settings on your 3D printer to what material you used, to tests done to see how it compares to similar designs.
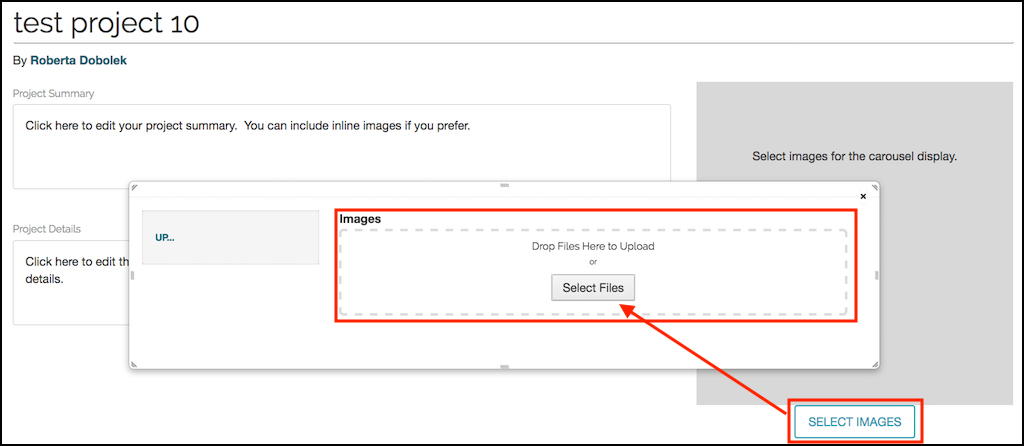
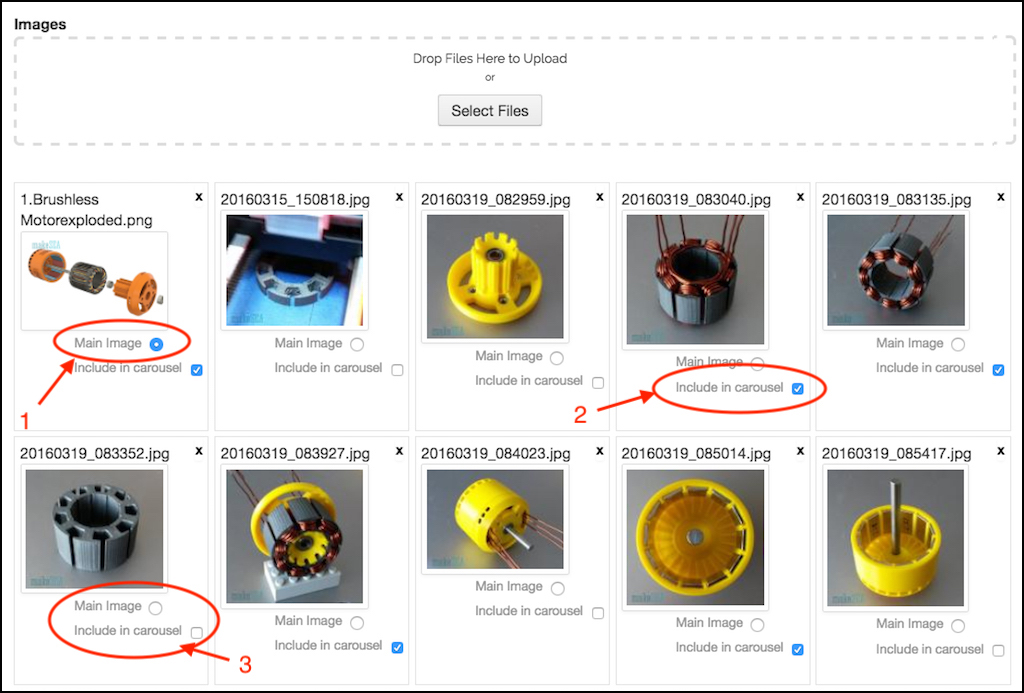
ADDING IMAGES
First, be sure you are in the Edit View mode. To upload photos for a project, click on SELECT IMAGES. This will bring up a box where you can drag and drop the image files or by clicking on the Select Files button you can choose the files you want to upload. Remember, you can add images to this section at any time as your project advances.
THE CAROUSEL
The Carousel is a revolving display for the images you want to include with your project. It appears on the right hand side of your Project page. This will be populated by the images you choose from those you have uploaded.
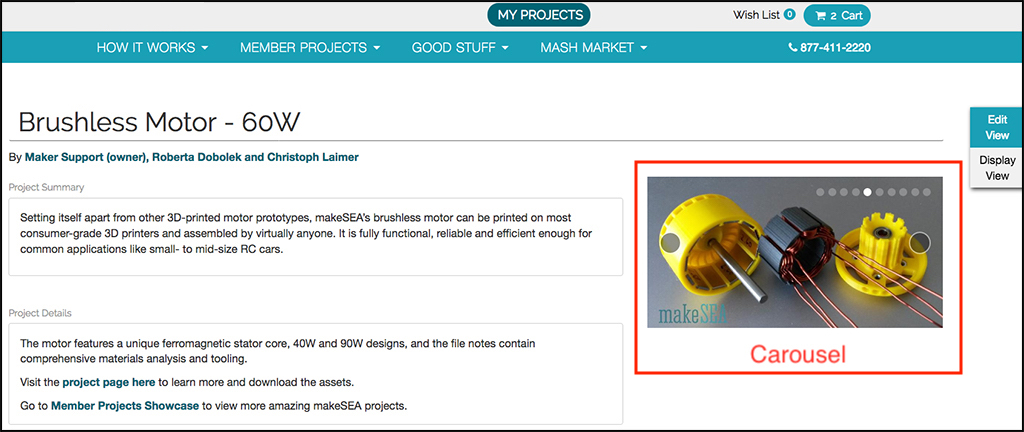
After uploading photos, (1) choose which image you want as the main image. In addition to being the first image in the Carousel, this will be the thumbnail that people see when looking through all of the projects. To add other images to the carousel, (2) simply choose those photos you want included in the carousel. (3) You do not have to include all the photos you uploaded in the carousel.
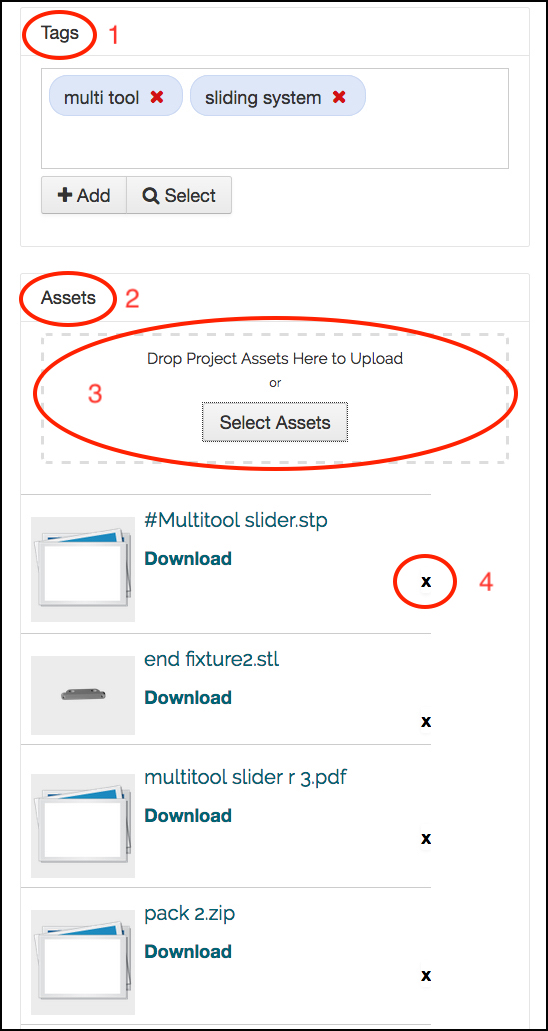
ADDING TAGS
(1) Under the Select Images button on the right hand side is a place to include Tags that will help others find your project(s). A tag is a label associated with your project. This identifying or descriptive marker(s) should be relevant to your project. To add a new tag click on the + sign and type in the tag name. Each tag you create for your project is visible under the Select button. Applying a tag or multiple tags to your project is optional.
ADDING ASSETS
(2) Assets are the files you use to print your 3D project. These can be any kind of file that is used to print or assist with completing the project. Note below that the author has included printer files (stl, stp), PDFs and even zip files. When you add an asset to your project, the system will automatically take all of the data it can from the file you upload and display it under Protected Asset Metadata. Some file types provide more metadata than others. When someone visits your project page all the files you have uploaded will be visible and available (based on the permissions you have established).
(3) Assets are added to the project the same way images are - either by a drag and drop method or by clicking on the Select Assets button and choosing your files.
(4) The X to the right of each asset will let you delete an asset at any time.
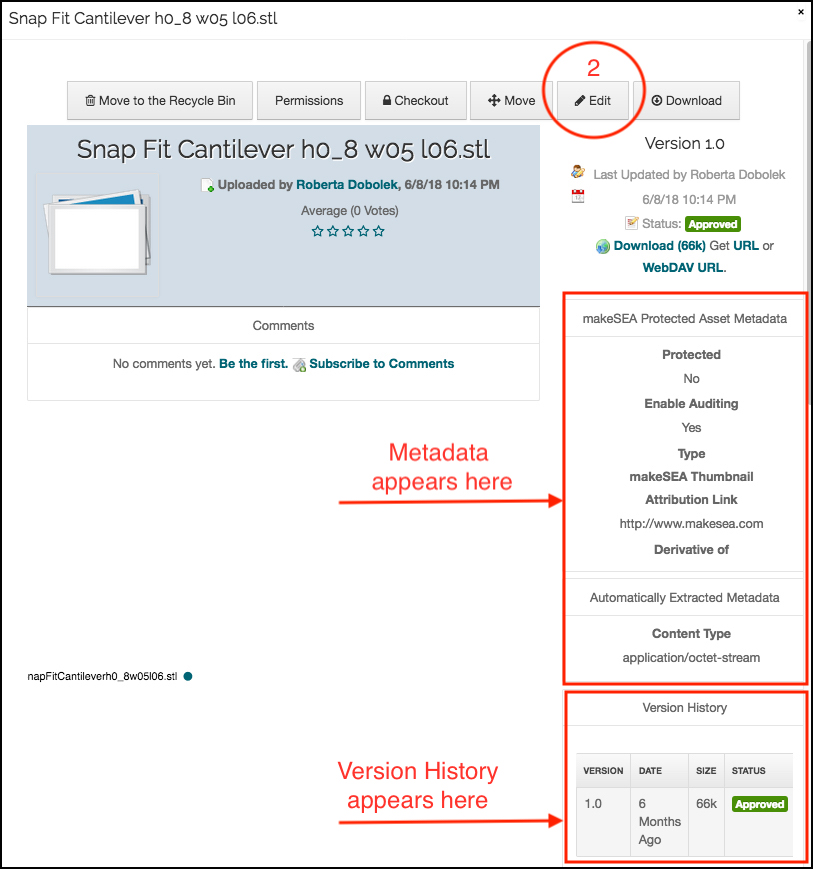
VERSION CONTROL - EDITING AND TRACKING CHANGES TO AN ASSET
When you want to make changes to an asset already in the system you can upload it as a newer version of the original asset. This feature will allow you to track how many different versions you have gone through to get to your final one. This is the version control feature built into the makeSEA.
To utilize the version control feature, you will need to access the original asset, which can be found on your project page any time you are logged into the system. You must be in edit mode.
(1) Click on the original file showing up in the asset list.

Clicking on the asset will take you to the next screen shown below. On this screen you will see the metadata related to your asset as well as the Version History. The version history changes as you save a new version of the asset. The original asset you uploaded was version 1.0. When you upload the next version it will show in the list as 1.1 then 1.2 etc.
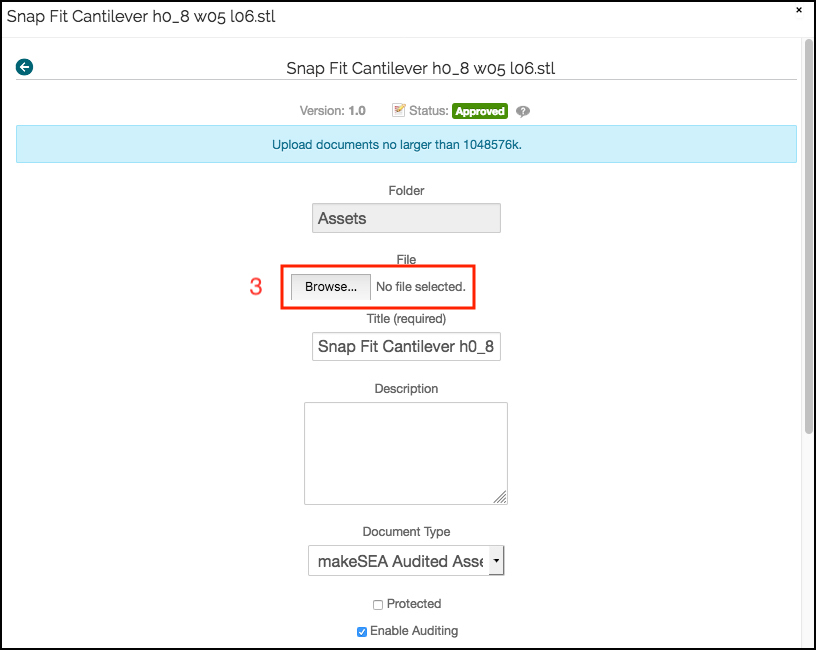
(2) To upload the new asset click on the Edit tab.
The Edit tab will take you to the next screen below (3) where you will browse for and upload your new version of the asset. After you have uploaded the new asset it will show up as the newest version in the list.
4. Saving your Project page
click to expand or collapse
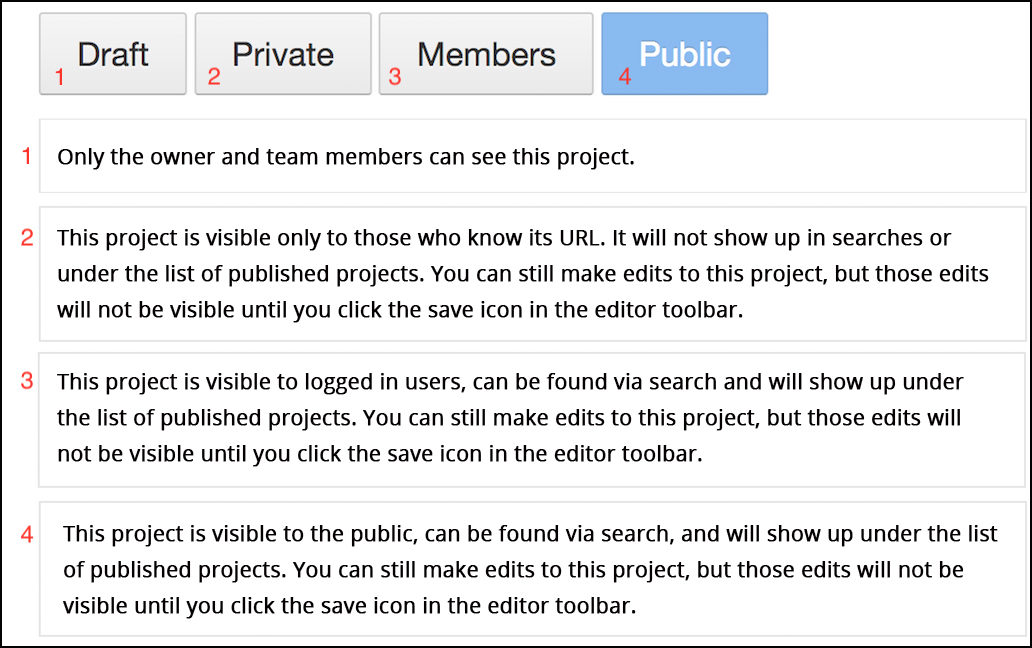
When you are ready to save your project page there are 4 choices (Draft, Private, Members, and Public) at the bottom of the page. See below for an explanation of each mode. Choose the one that works best for your project and how you want it to be viewed. Remember you can return to your project page at any time to change, update or add to the content files and images and even change how you have the project saved.
5.  Share and Collaborate with Catapult for mixed reality
click to expand or collapse
Catapult and makeSEA allow anyone to share and collaborate using 3D content produced by most 3D design platforms. The App requires Magic Leap One goggles to launch. To publish content to Magic Leap and use the Catapult App you must first do the following:
- Register with makeSEA and Create a Project.
- Go to the native platform where you have created 3D content and export it in GLB format. Add these exported assets to the Project you have created in makeSEA.
- Add team members to your project and set your preferred sharing mode to Private, Public, etc. See Section 5-Saving Your Project Page - for more information on these settings.
IMPORTANT: Asset sharing in Catapult will not work if the Project is in Draft mode. Pease be sure the Project you wish to share is set to Private, Member, or Public mode before proceeding.
___________________________________________________________________________
Version 2.0c New Features!
Save your work:
The layout and placement of assets in the Project collaboration space can be saved by the Master of Ceremonies. Participants joining or returning to the space can choose to restore the layout to the last saved state for all placed and scaled objects. This is perfect for staging and dressing any space for others to visit, any time in the future: for education, demonstration and training, creative, or marketing purposes, etc. An option to periodically auto-save the layout is available in menu under General Settings. Just upload your content, joint Catapult and layout your space, and save it for reuse. Done!
Blow stuff up!
Objects with multiple layers can now be exploded (expanded into their constituent parts - not a fiery explosion), by using the laser to shoot the "Explode" button displayed above the object: hold the Trigger to expand, release to stop. Depending on the source file, individual parts can be manipulated by placing your Control inside the part, pulling and holding the Trigger, and dragging the part; let go of the Trigger to release the object. Shoot the "Return" button to reset the object to its original state.
Labels and Descriptions:
Assets now display label names and description details. Asset names are derived from the asset Title, as stored in makeSEA, without the file name extension (e.g., ".glb"). Clicking on the label will toggle the display of the details for the asset if they exist in the asset's record in makeSEA. The sub-part names are displayed when the object is Exploded. The sub-part names are derived from the name of the part as stored in the asset file, itself. For example: if you have an asset with the name "Wind Turbine.glb", which has sub-parts in the model, the label for the asset will be displayed as "Wind Turbine". Clicking on the label will toggle the display of the detailed description for the asset, if it exists. If the asset has parts embedded, like "propeller" for example, the name of each part will be displayed when the asset is Exploded, and the details will fade away.
Livestream Video support is here!
You can use makeSEA's Remote Presence workflow and video streaming services along with Catapult spatial collaboration and a 360 surround camera to produce realtime remote co-presence/remote hands support for any location. DASH (.mpd indexed), and HLS (.mu38 indexed) livestream video in screen and 360 surround format is now supported by adding a Remote Asset to the Project that points to the livestream source and is designated with the string "livestream"or "livestream_360" or livestream_autoplay_360 in the Description field when creating the Remote Asset link. The option to play the video is listed under the Catapult menu along with any other video assets available in the active Project collaboration space that you are in. Designating 'livestream_autoplay_360" in the Remote Asset Description will cause the livestream surround video to begin playing automatically when a user joins the space.
360 surround video auto-play is now supported
The first listed video for any project ending in "_autoplay_360.mp4" will automatically play when a user joins the project collaboration space. This is great for setting a mood, giving the participants context, or as ambient content for mood or effect.
Support for collaborative measuring added
Look for the tape measure tool icon under General Settings. Select the icon with the laser and pull the trigger to place a tape measure in the collaboration space. The tape can be moved by grabbing the center of the tape tool, or by moving the end points by placing your Control inside the ball at either end, holding the Control Trigger, and dragging. Release the Trigger to place each end point at each end of the desired location to measure. The endpoints can also be manipulated by looking at them and using the Control Pad gestures to move the endpoint from a distance. The length of the tape is indicated above the line towards the center. It can also be used as a trajectory marker. You can use multiple tape measures. All participants see the tape measure and resulting measurement.
___________________________________________________________________________
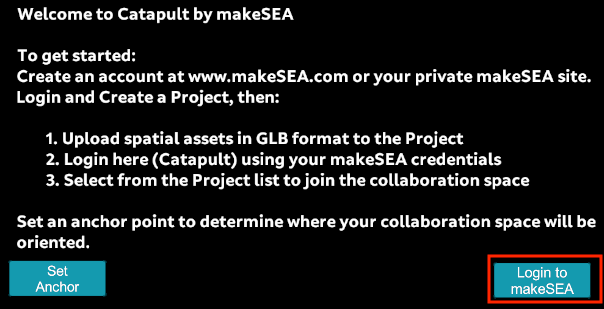
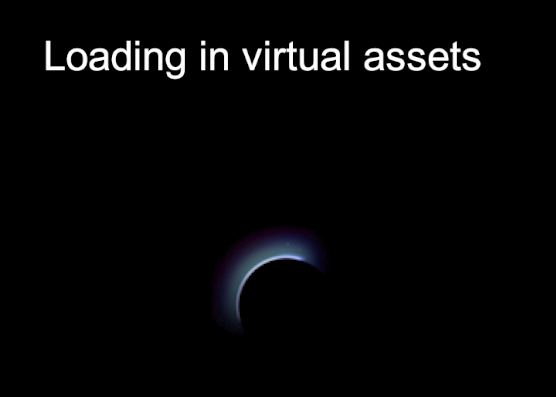
Now you are ready to download the Catapult App. The first screen you will see is shown below. Remember before you can use the app you must have completed the steps outlined in Red.
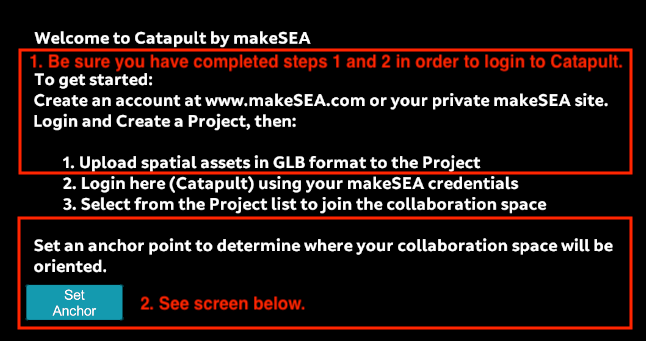
SETTING THE ANCHOR
The Anchor may be set in two ways.
1.On the first screen you will also be asked to set an anchor for your collaboration space. Follow the on-screen instructions and when you are ready, using the controller, point at the "Set Anchor" button and pull the trigger.
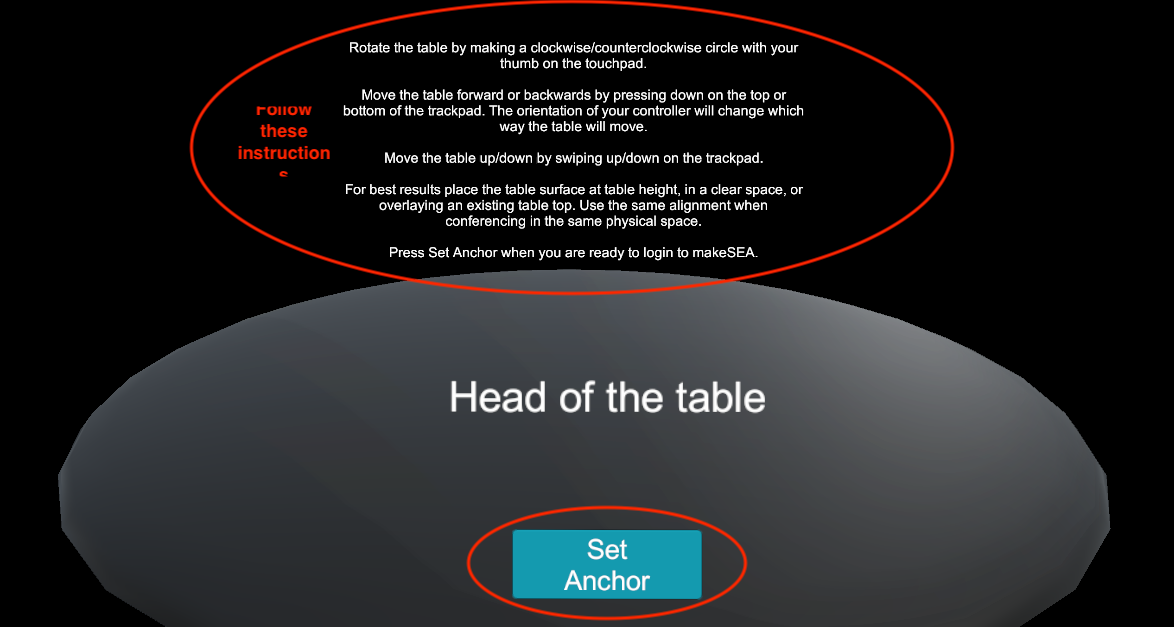
Or the Anchor may be set by using the Anchor Image shown below.
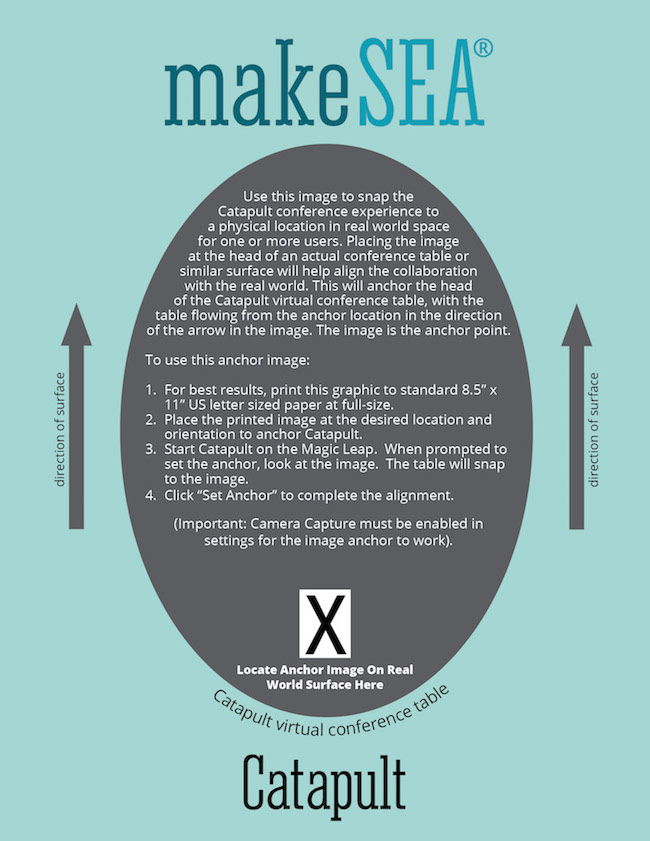
- Download the image here: https://www.makesea.com/anchor and print the page, preferably on an 8.5" x 11" paper.
- Follow the instructions on the printed page to determine the placement for your Catapult App.
- Start Catapult on the Magic Leap and follow steps 3 and 4 to set the Anchor.
After setting the Anchor for your collaboration space you will login to Catapult using your makeSEA credentials. Using the controller point at the Login to makeSEA button and pull the trigger.
This will take you to the keyboard to enter your makeSEA credentials. After entering the username and password credentials for makeSEA point the controller and choose the Login button.
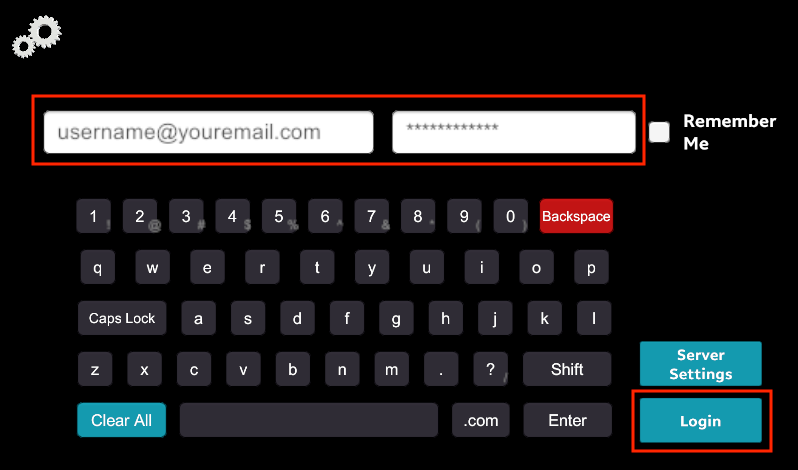
Note on the Login keyboard: Use Shift key if your login information requires capital letters. Server Settings button is only used to change the URL for Corporate/Enterprise clients.

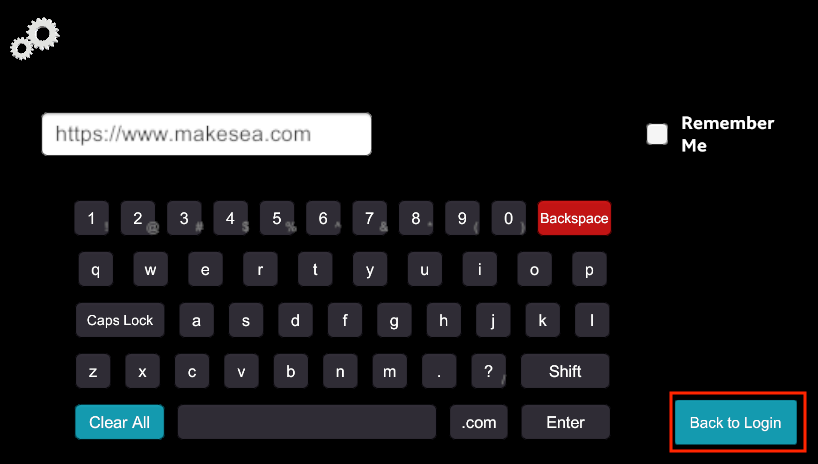
If you are an Enterprise client and have chosen the Server Settings button you will see the screen below where you will enter your unique URL and then continue by choosing the Back to Login button.
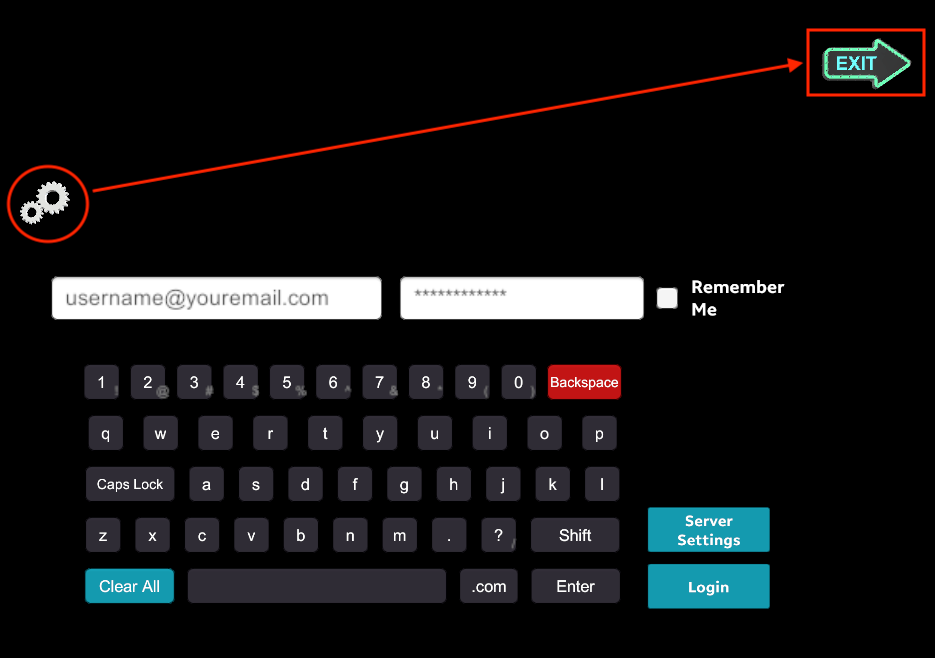
Note that on login screen the Exit Sign will appear if you click on the gears in the upper left hand corner. This will exit you from the application.
BASIC CONTROLS TO BE FAMILIAR WITH
There are some basic controls that will help you understand how to navigate in the application when you open a project.
- Conjure settings by making a fist in front of you. Then click the gear to fix the settings in place.
- You will be prompted to anchor your environment before proceeding. The head of the virtual conference table serves as the anchor.
- The bookshelf (or grid) of viewable objects in a conference space is to the right of the head of the table.
- If more than 6 objects are checked in, the bookshelf will allow the Master of Ceremonies (MC), to paginate through them and take other participants along. Become MC to change bookshelf pages by displaying the Settings and clicking on the Control located near the Settings Gears. A blue Control indicates you are the MC.
- Objects will grow slightly when moved from the bookshelf for better visibility. All participants can manipulate the objects in a scene. Use one of two methods to do this.
a. Place controller inside the object, pull and hold the trigger, and drag the object to a desired location. Release the trigger to leave the object where placed.
OR
b. Focus your eyes on the object you want to move. Use the Control Pad located at the top of the controller to manipulate the object.
I. Press up/down to push/pull the object
II. Press left/right to move the object side to side
III. Swipe up/down to move the object up or down
IV. Make a circle gesture to rotate the object
V. Swipe left/right to shrink or enlarge the object
Shown below is an example of the assets in a project on the "bookshelf" or grid.
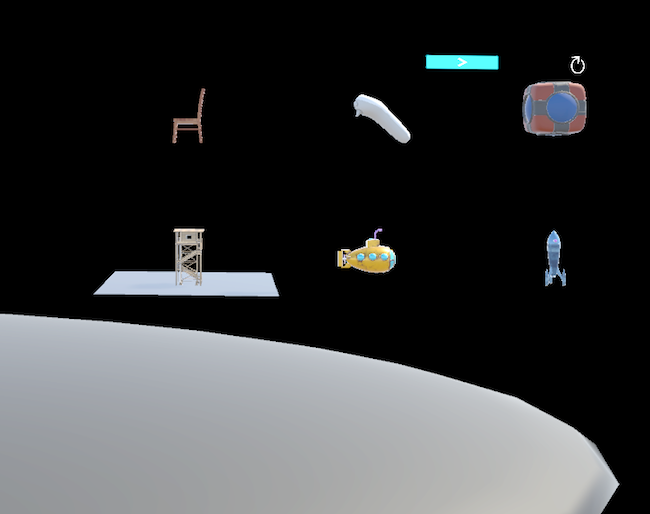
AFTER LOGIN
After login user will see My Project List as shown below. This shows all projects the user is a member of. To view the 3D assets for a project aim the controller at the project and pull the trigger. Choose a project to join a common collaboration space. Only team members can join projects marked as Private. 3D assets are displayed on a bookshelf and can be manipulated with the controller.
The arrow in the upper right corner will refresh the page. You may go to Public Projects by choosing the button on the bottom right hand corner.

Public Projects are visible to all users. On this screen you will also see a Showcase section that highlights projects that wow! This screen may also be accessed by clicking on the gears in the upper left hand corner and choosing Public Projects. To view the 3D assets for a project aim the controller at the project and pull the trigger. Again the assets will appear on a bookshelf.

After choosing a project to view the following two images will appear in sequence.

VIDEO STREAMING SUPPORT
Catapult allows the Master of Ceremonies to select from a list of compatible videos stored with any makeSEA Project in .MP4 format for display onto a placeable and scalable screen that all participants can view. 360 surround videos are also supported and may be played to wrap the project collaboration space in immersive video content. A resolution of 720p or 1080p is recommended for on-screen video. Surround video of up to 1.5K (1536 x 3072px, mono, spherical panoramic), is supported. Project video files should be uploaded with a file name extension ".mp4". Videos with a name including "_360.mp4", are assumed to be surround videos by Catapult. Videos are selectable by the Master of Ceremonies from the Settings menu, which can be conjured by making a fist in front of your face.
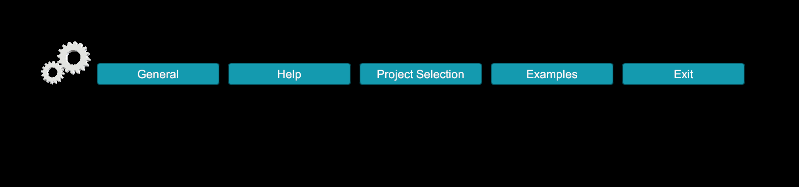
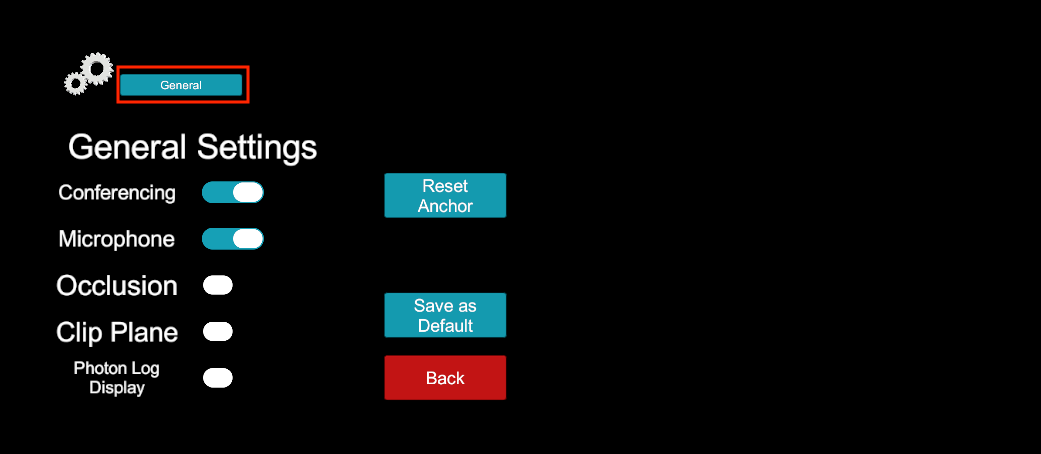
SETTINGS
In the upper left hand corner of most screens you will see the gear icon. Clicking on this allows access to various settings as shown below.
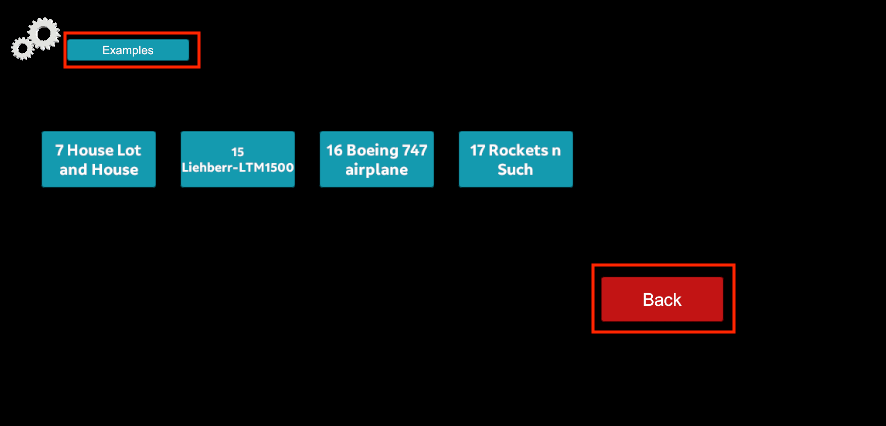
Below is the screen you will see if you click on the Example tab under Settings. Choose the appropriate tab to view each. Use the back button to return to the settings tabs.
Screen depicting the General settings tab under Settings.
 Help screen below is loaded from settings tab by clicking Help under Settings. By clicking on the detailed instructions you open a page on makeSEA.com with more detailed instructions.
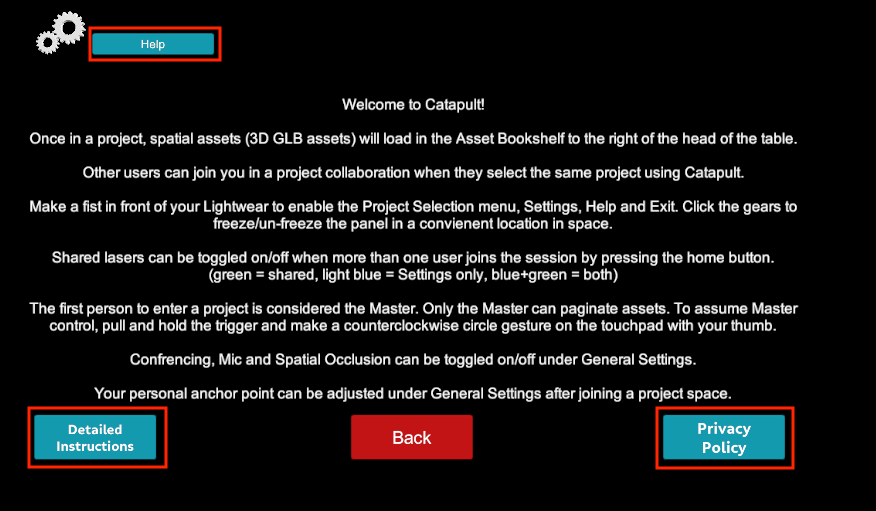
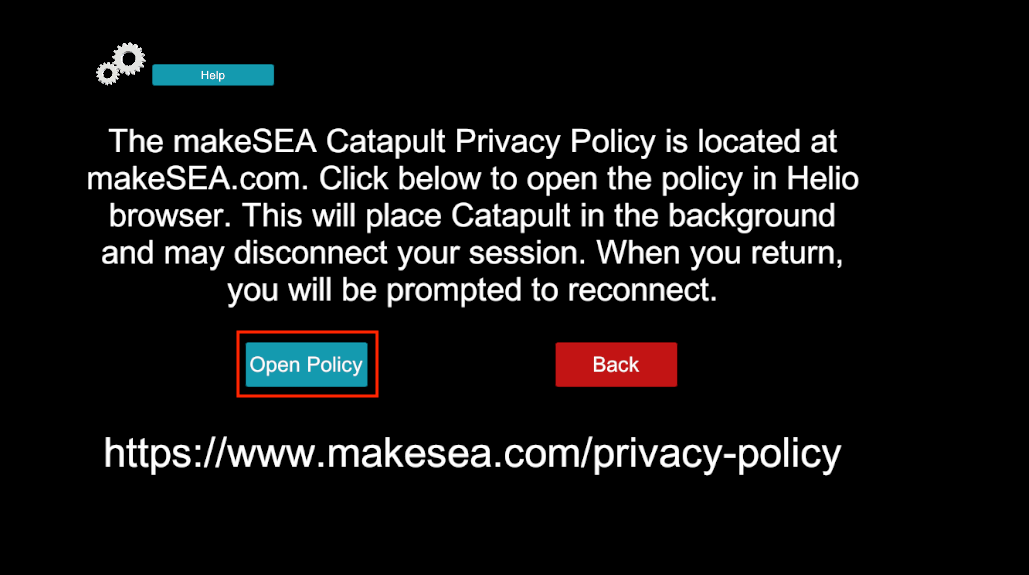
Also under the Help tab you can view the Privacy Policy screen by clicking on the Privacy Policy link shown above. Please read the screen instructions visible when you click on the Privacy Policy button. These instructions are shown below.
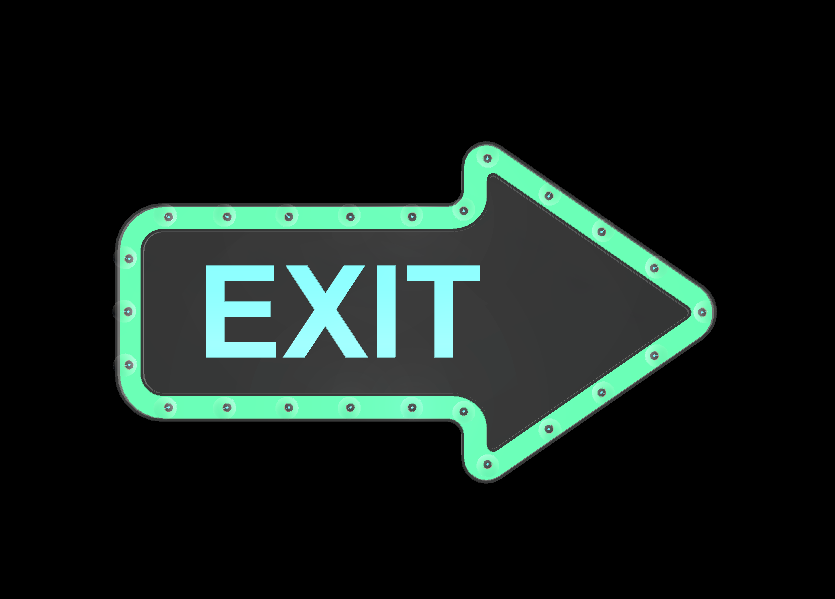
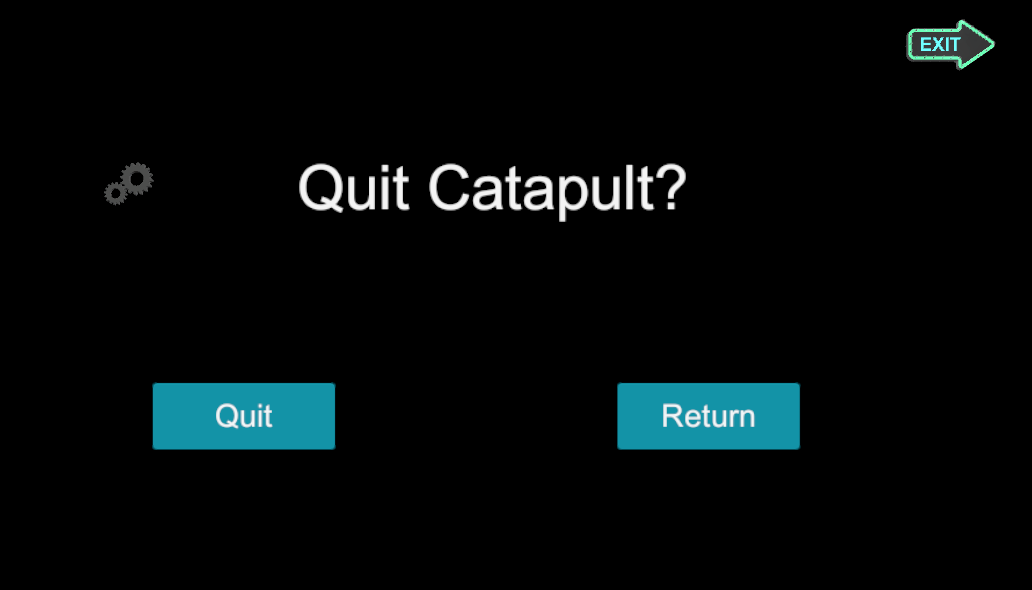
You may exit Catapult temporarily or disconnect from the conference by choosing the Exit tab in settings. There are several ways to quit the application.

The Exit sign looks like the one below. This sign also appears at the foot of the table in your conference space when a user makes a fist over the Gears icon.
When you choose to Quit Catapult at any time. You will get a screen that looks like the one below. You can choose to Quit the application or Return to the previous screen from here.
MARK UP CONTENT FOR HELIO BROWSER AND MAGIC LEAP
The makeSEA Content Editor features a Magic Leap Prismatic markup tool that can be used to apply Prismatic display transforms and animations to content that is observable using the Magic Leap Helio Web browser when visiting the project page.
You can upload GLB, GLTF, and FBX models to the project (with or without textures), and use this tool to markup the object on the Project page so that it floats in space, spins, moves, animates, etc.
Once assets are added and marked up using the editor, visit the project page URL (or shortcut) from the Helio Web Browser on the Magic Leap device to interact with the content using standard Helio interactions (pick off the page, place, scale, rotate, etc.).
GLB formatted assets (compressed GLTF+bin packages), are ideal for use in makeSEA because they work across the broadest set of workflows. GLBs can also be previewed in a standard Web browser by clicking on the details link for the asset. GLTF 2.0 and GLB are rapidly becoming the standard for cross-platform packaging of 3D objects with materials, metadata, shading, and other features.
The preferred settings for most 3D authoring applications on save/export are:
- GLB (binary) format
- GLTF format version 2.0 compatible
- Embed all textures and materials when asked
- Use double-sided walls when asked
- Defaults scales work for most applications but if incorrect try order of magnitude +/- (e.g., 10x, 100x)
- Some CAD and BIM platforms may require swapping the default exported axis (usually Z)
- Try the default scale on export and adjust as needed; results will vary by source application and version
If your 3D authoring tool of choice does not support GLB natively, there may be a plugin you can install. Check the authoring tool's app store, or, for more information on available plugins, applications, and conversion tools please see:
GLTF/GLB Supported Applications & Tools
If you are seeking support for a specific file format, we may be able to help. Please email support@makesea.com and let us know your requirements. We'll do our best to help.
Suggestion: Set the Helio Browser to Dark Mode for transparent display of articles "kiosk style". Try playing with font colors and object transformations to create floating information displays above real world objects that persist in space, even between Magic Leap shutdown/restarts.
CKEditor MLImport Guide
Overview of the MLimport Plugin:
Allows for the easy importation and manipulation of ml-model object
The mlimport plugin is designed to allow for the easy importation and manipulation of ml-model objects for insertion into a page.
Clicking the button located in the wysiwyg

Opens up the plugin:

There are four tabs that contain attributes for the ml-model:
- Basic - contains basic information about the ml-model and quick access to commonly changed attributes
- Style - contains attributes related to basic css styling and ml-model specific styling to alter the location, size, and color of the model.
- Static Transforms - contains transformation attributes that are applied when the model is initialized, such as an initial rotation.
- Animated Transforms - contains transformation attributes that are applied over time, like the spinning of a model over a set duration.
BASIC TAB: includes some of the required attributes and a lot of attributes that are frequently changed.

The attributes include:
-
Name - If an image thumbnail is not selected, the name is inserted:
<ml-model> name </ml-model>
this is to allow for the easy selection/deletion of the ml-model and to mark where on the page the model is located.
-
Id - The Id, when used in conjunction with the raycast boolean, identifies the object for use in a node raycast event
<ml-model
  id="balloon"
  src="balloon.fbx"
  style="width: 300px; height: 300px; position: absolute; right: 50%; top: 50%;"
  raycast="true">
</ml-model>
<script> balloon.addEventListener('node-raycast', function (e) { ... }); </script> -
Source URL - this is the source that will be displayed in the ml-model. Currently supported file formats are .fbx and .glb . Clicking the browse server button allows for navigation through projects and assets for selection of the source url.
-
Image Thumbnail URL - This property overrides the name for use in allowing the easy selection/deletion of the ml-model and marking of where the model is located on the page.
-
Visible - this checkbox allows the toggling of the 'visibility' attribute. When checked, visibility is set to 'visible' and when unchecked visibility is set to 'hidden'
-
Scrollable - this checkbox allows the toggling of the 'scrollable' attribute. The 'scrollable' attribute only renders model when scrolling through the viewport when set. Disabled by default. Ml-models with "scrollable='true'" are only rendered when they are currently in the viewport and they stick to where they are at on the page. With "scrollable='false'" the ml-model will scroll with the viewport.
-
Raycast - this checkbox is used in conjunction with the id attribute. See https://creator.magicleap.com/learn/guides/prismatic-raycast for more details
-
Extractable - this checkbox is a boolean that enables the model to be pulled out of the page and placed in the user's environment. Checked: true, unchecked: false.
-
Extractable Scale - The extracted scale is a number which allows the user to pass in a multiplier with the extracted model that will scale the model once extracted.
STYLE TAB: The style tab contains attributes related to basic css styling and ml-model specific styling to alter the location, size, and color of the model.

Attributes:
- Width - css attribute controlling the size along the x-axis.
- Height - css attribute controlling the size along the y-axis.
- Breadth - ml-model attribute controlling the size along the z-axis. If there is no breadth specified the model matches the size along the x-axis. The value of breadth could be in pixels (px), centimeters (cm) or millimeters (mm) units.
- Left, Right, Top, Bottom, Position - all css attributes controlling the location of the model.
- Z-offset - Controls how far off the page the model will appear. By default, models are positioned forward on the z-axis. You should provide a:
- positive value to position the model more towards the user
- negative value to position the model away from the user
The value of z-offset supports pixels (px), centimeters (cm) or millimeters (mm) CSS measurement units.
- RGBA - This allows you to set the red-green-blue-alpha value for the ml-model. RGB values range from 0-255 and the alpha value should be a float from 0 to 1. Red goes in rgba R, green in rgba G, and so on.
STATIC TRANSFORMS TAB: The static transforms tab contains transformation attributes that are applied when the model is initialized, such as an initial rotation. Each attribute contains an X,Y, and Z value.

Attributes:
- Model-scale - Sets the model scale within the Prism. By default model scale is calculated to be the maximum size of the Prism.
- Model-position - Sets the model position within the Prism. By default the model position is set to
- Prism-rotation - Rotate the prism by a specified amount of degrees.
- Rotation - Sets the model rotation within the Prism using Euler Angles.
ANIMATED TRANSFORMS TAB: The animated transforms tab contains transformation attributes that are applied over time, like the spinning of a model over a set duration. Each attribute has an x,y,z property, duration property, and track property.

Tracks:
Tracks allow you to queue your animations.
- If you want your animated transforms to run sequentially, place them on the same track (for example, track 1).
- If you want your animations to run simultaneously, place them on separate tracks (for example, track 1, track 2, and so on).
Attributes:
- move-to - Move the model within the Prism to the specified position (x,y,z) over the set duration.
- move-by - Move the model within the Prism by the specified position (x,y,z) over the set duration
- rotate-by-angles - Rotates the model over time by the specified angles.
- scale-to - scales the model over time by the specified scalar over the duration.
- spin - spins the model on the axes specified with a 1. If you want to spin relative to the y-axis, "x y z" would be "0 1 0". My understanding is that the degrees is the amount of degrees spun per second.
EDITING: When an ml-model is placed on the page, you are able to right click it to edit any attributes you wish. The mlimport plugin will be populated with the same attributes as before and if they are changed a new ml-model will be inserted in its place.

Helpful links:
Prismatic API reference: https://creator.magicleap.com/learn/reference/public/v0.16.0/UIKit/index.html
Prismatic guide: https://creator.magicleap.com/learn/guides/prismatic-positioning-quads-and-scrollable-content
More information on the specific Prismatic transform controls and their impact to display is available here:
makeSEA Mixed Reality Workflow File Compatiblity Matrix
Your makeSEA Project space supports any file type for storage, versioning, and tracking. For live asset sharing (when not using a makeScene package), the best performance and forward compatibility is usually the GLB format, which can easily be saved from your favorite 3D design tool. The following formats are compatible with XR collaboration using Catapult:
| Application/Interface | Source File Format | Supported Object Complexity (varies by XR client device) | ||||||||||
| GLB (export from any) | GLTF (animated) | FBX | OBJ | STL | Live/Rec Video | 360 Skybox Video | Native/Any | Low Poly (10K) | Med Poly (100K) | High Poly (100M+) | ||
| Catapult Live Publishing (release 2.0C) | X | Convert to GLB | X | X | X | X | X | Yes-contact makeSEA | X | X | ||
| Catapult OTA makeScene package* | X | X | X | X | X | X | X | Yes-contact makeSEA | X | X | X | |
| Helio Browser (Prismatic) | X | X | X | X | X | X | Yes-contact makeSEA | X | - | |||
| Any Web Client | Preview, Storage, Versioning (P,S,V) | P,S,V | P,S,V | P,S,V | P,S,V | P,S,V | P,S,V | P,S,V | P,S,V | X | X | |
562028 Views
Pictures and video don't convert like first-hand experience does.
Research shows that using augmented (AR), and virtual reality (VR), is more compelling and more likely to persuade your audience to buy, learn, and understand what you have to share. Use makeSEA to deliver content that connects with your audience like no other medium can.
Compel your audience with

Content Management and Cross-Platform Collaboration
for Augmented and Virtual Reality
The fastest way to organize and share your content as if you are together with your audience in real life and keep it fresh using next-generation virtual and augmented reality technology.


It's time to change the way you communicate, collaborate and compel your audience.
Time to change the way you capture and curate evolving ideas.
Use makeSEA content management platform + Catapult, our cross-platform client app for mixed reality and spatial collaboration to share your vision and inspire your audience with content that you are already producing.
10X-100X Time Savings • Recyclable Content & Scenes
Use makeSEA to reduce your AR and VR production time by an order of magnitude, or two.
Blend content from multiple sources tell a better story: 3D models, real-world scans, video, and you!
Keep things fresh and relevant and improve experiences over time as your content and XR technology mature.
Enabling augmented reality, mixed reality and spatial computing for everyday use.SM
Catapult your vision, in real-time together, for FREE.
It's as easy as a social media post:
-
Create an account, start a project and upload your content from most any content source1.
-
Launch Catapult, makeSEA's mixed reality client app on your VR or AR compatible device2.
-
Share and collaborate using your own spatial content, with others together in real-time, in the same physical space and remotely.
Click Here to Get Detailed Instructions, Download and Install
Try makeSEA now! Simply register here and start publishing.
makeSEA is also available as a privately branded (white-label), or custom integrated solution for enterprise. Please Contact Us for more information.
for Architecture
& Design
& Design
Magic Leap &
AR/Mixed Reality
Content Publishing
AR/Mixed Reality
Content Publishing
for Education
& Making
& Making
for Construction
for Trade Shows
& Exhibits
& Exhibits
for Retail
& Branding
& Branding
1:Catapult supports assets saved in GLB (preferred), FBX, OBJ, STL or MP4 (standard 720p, 1080p, or 3K 360˚ spherical surround format), or a makeScene package for live over-the-air collaboration with shared spatial content. See the how-to guide for hints and instructions on how to easily export or convert content from most 3D authoring tools and platforms. 2:makeSEA supports Oculus Quest 2, Magic Leap 1, and Microsoft Hololens 2, makeSEA for Enterprise supports additional client devices; contact us for more information.
 Trade Show Alternative
Is your tradeshow game plan caput because of COVID? Ours is! It's OK: use makeSEA and MagicLeap for Trade Shows and Exhibits to put your full-scale booth — that you host live and your...
Free makeSEA Account & Catapult App
makeSEA user accounts and Catapult for spatial computing have always been free. Covid-19 is changing the way we work, collaborate, interact and learn forever. It is accelerating the shift to...
Where Do We Go from Here?
I think we all have to accept that part of today's normal will become the "new" normal. At any time, another pandemic or other crisis can and probably will affect the way we teach, learn,...
Doing our part to help with local PPE
Doing our part to help with local PPE needs using hashtag # makeSEA hashtag # Catapult and hashtag # MagicLeap for rapid iteration and visualization on 3D printed...
Additive Manufacturing, AR and COVID-19
The global manufacturing industry is reeling from the effects of the COVID-19 outbreak. The mega-factories we rely on are experiencing shortages of personnel and raw materials for production....
Adapting to the New Normal
We are entering a new era. Whether you are a business, in the education field or just looking for ways to communicate safely, we are being forced to accept that we all need to find ways to...
Feeling Like a Fish Out of Water
During this time of uncertainty, we're all feeling a little like a fish out of water. Looking for new ways to conduct business, educate and train, share information and collaborate with...
Look to the Future with Spatial Computing
Now more than ever we need to think about keeping organizations running smoothly in a crisis. We are all being challenged and forced to look at the future. Businesses, educational...
Use Catapult for Forensic Visualization
What can you do with makeSEA and Catapult for Magic Leap? How about forensic visualization. Imagine being able to securely convert and deliver forensic scans data to full-scale immersive...
makeSEA is More
makeSEA is busy printing masks to help with the Coronavirus crisis. makeSEA's core value starting out was to support independent 3D designers, maker spaces and education with a platform that...
Change How You Communicate and Collaborate
It's time to change the way you think about collaborating, communicating, teaching, and design. Time to change the way you capture and curate evolving ideas. Use https://makeSEA.com + ...
makeSEA Catapult App launched on Magic Leap World
It's time to change the way you think about communicating, teaching, and design. Time to change the way you capture and curate evolving ideas. Use makeSEA + Catapult and Magic Leap...
makeSEA at Construct 3D Conference
Look for us at the Construct 3D Conference between February 13-16 at Rice University in Houston, Texas. We’ll be joining an awesome list of sponsors and exhibitors and hope to see many of you...
Positive ROI with the Use of Mixed Reality
Mixed Reality (MR) is an umbrella term given to computer-generated environments that either merge the physical and virtual worlds (AR) or create an entirely immersive experience (VR) for the...
How Technology is Impacting Education...In a Good Way
Today’s students have been raised on digital devices—digital engagement is a part of their DNA. It seems like a “no-brainer “ that instructors, especially at the high school and...
Easy Augmented Reality
makesea for Augmented Reality (AR) is a SaaS that supports a number of verticals and at the core is a content management platform that can be dressed for any experience from consumer branding...
AR and 3D Printing Should be Part of Advanced Curriculums
makeSEA for Education provides a safe, secure environment for students to collaborate and iterate on 3D designs and projects. Our SaaS platform also offers a way to get started with Augmented...
Using AR for EDU
It’s no secret that keeping the attention of today’s students is harder than ever. From grade school to college level, these students have been raised with...
Some AR Stats to Think About
Download the infographic . If you think Augmented Reality/Mixed Reality is still just something to think about, think again! This technology is being used in everyday businesses...
A picture is worth a thousand words
Sometimes a picture IS worth a thousand words. makeSEA can get your firm AR ready. Have you considered how Augmented reality (AR) could help your architecture or construction firm? ...