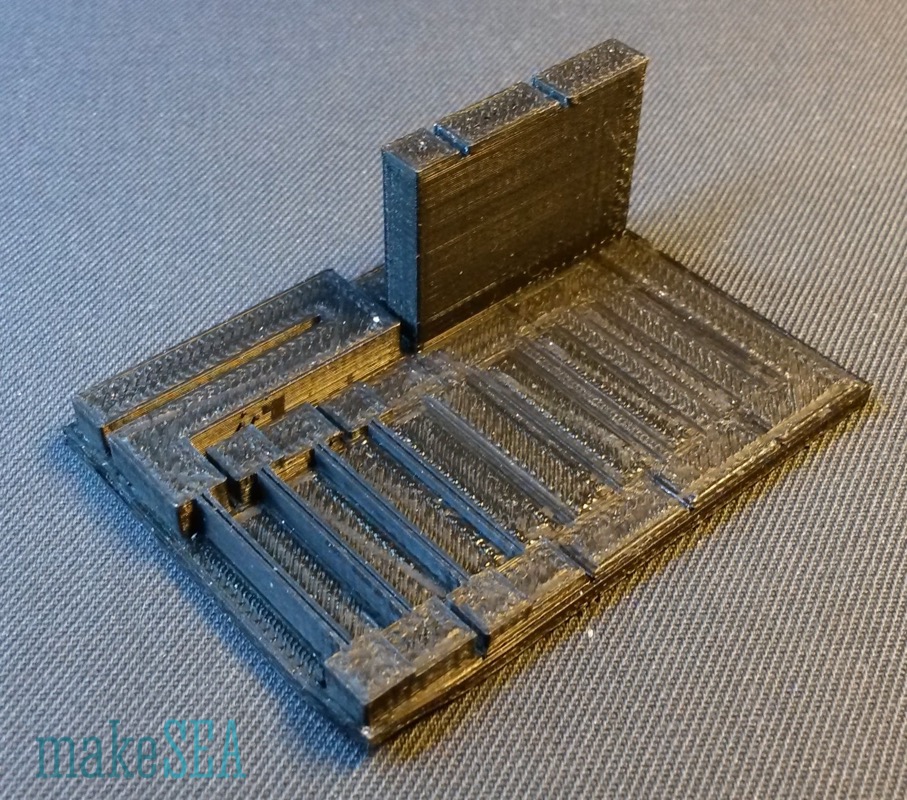
After suceeding with printing magnetic PLA, it wasn't a big problem to print conductive PLA. This material behaves very similar as normal PLA. With additional cooling and lubrication, it is possible to print PLA with 205°C nozzle and 60°C build platform on Capton. The material seems a bit more brittle compared with regular PLA, wich doesn't matter because it's conductivity is my primary interest.
In order to measure conductivity (resp. resistivity), I created this design:
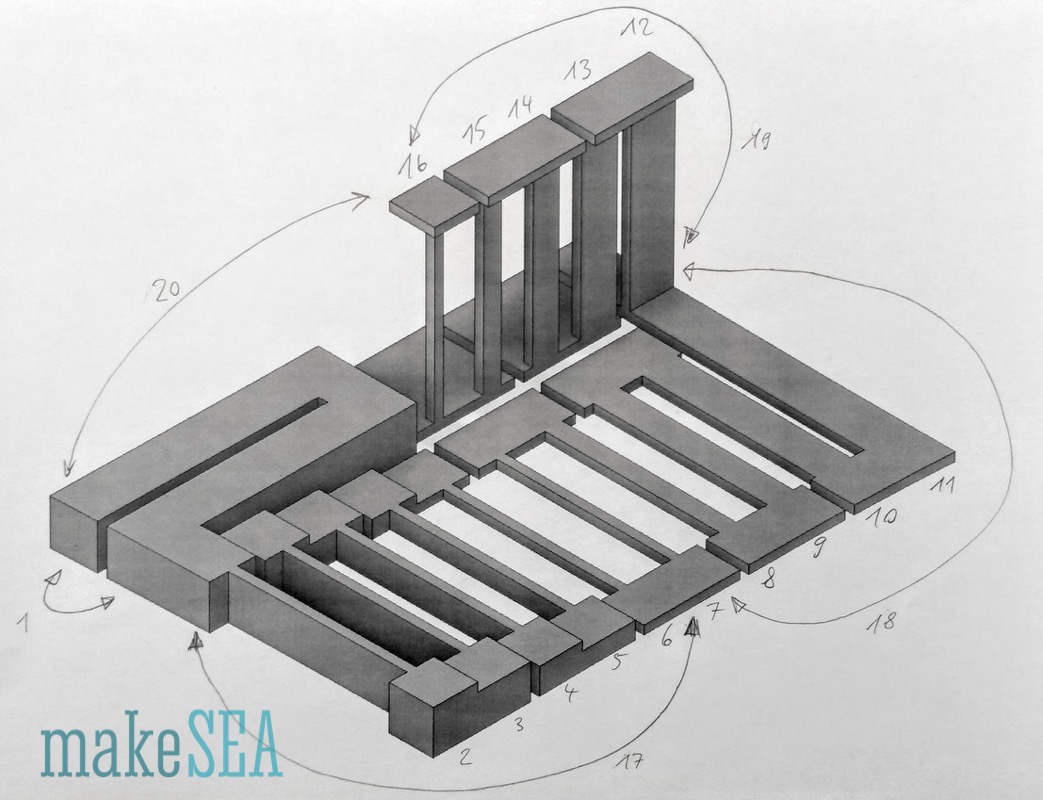
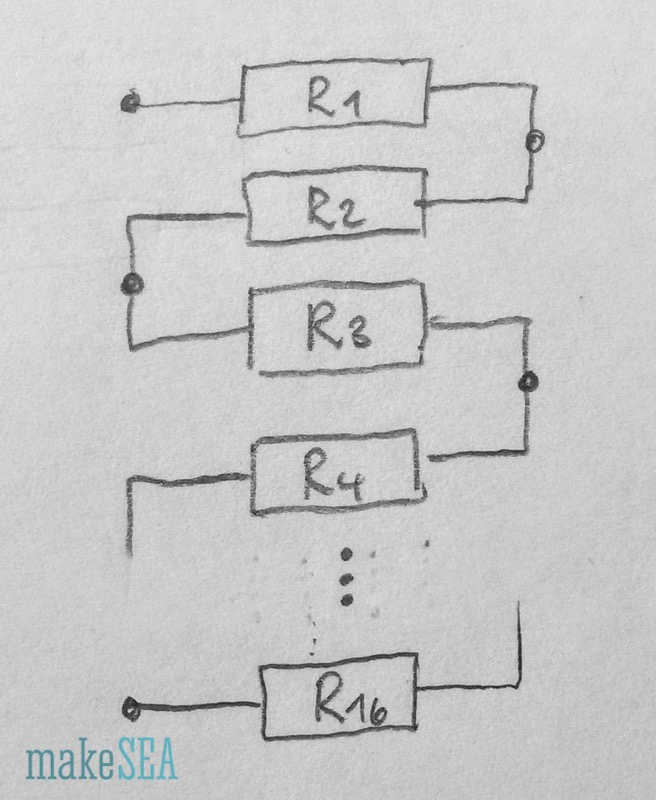
The design is a single connected wire with various shapes. Cross-sections are ranging from 1 mm^2 to 5 mm^2, the length of individual sections is 20 mm. In total 16 different resistors wired in series, with larger pads for contacting the measuring probes. The circuit scheme looks like this:
For 3d printing on the Replicator 2x I was using the original Makerbot Slicer Software and Simplify3D. In order to have maximum cunductivity I set infill to 95% (could also do 100%, but I was fearing a messy overextruded print, if parameters and filament are not perfect). As isolator I was using regular black PLA. The results from both slicers were similar.
For measuring the resistance, I used two different methods.
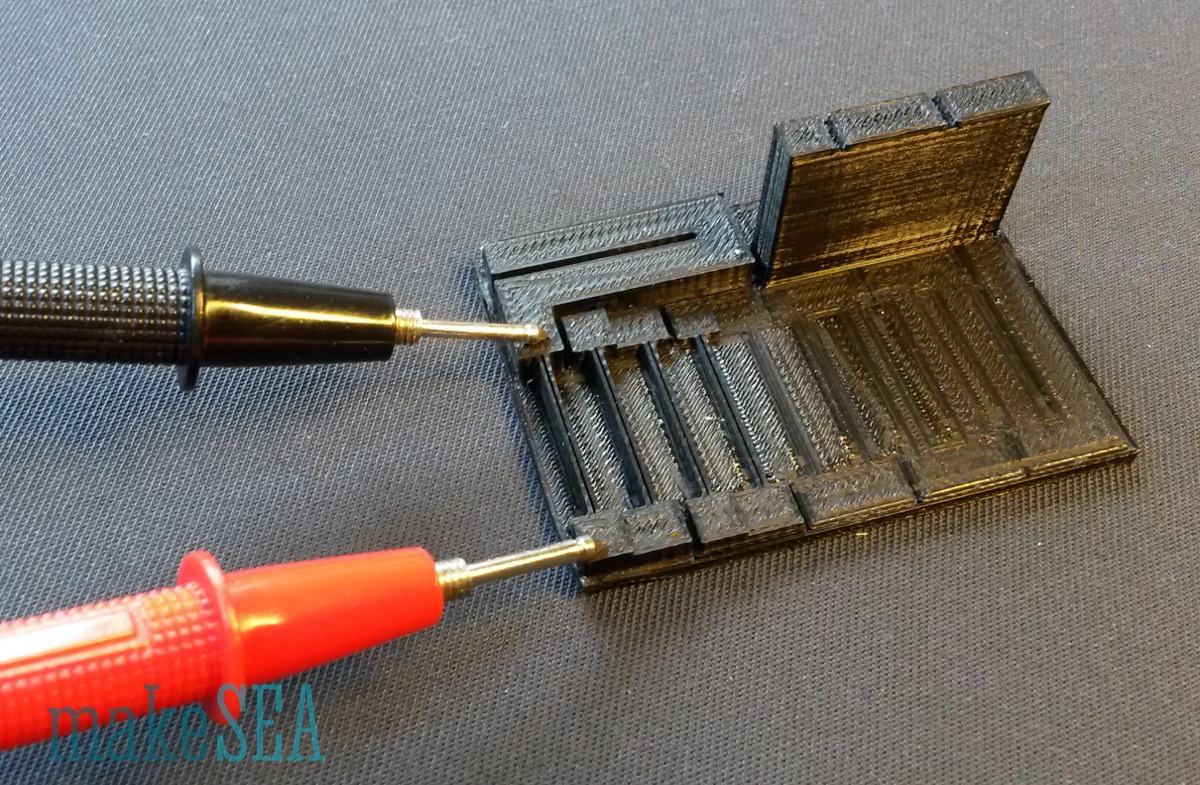 | 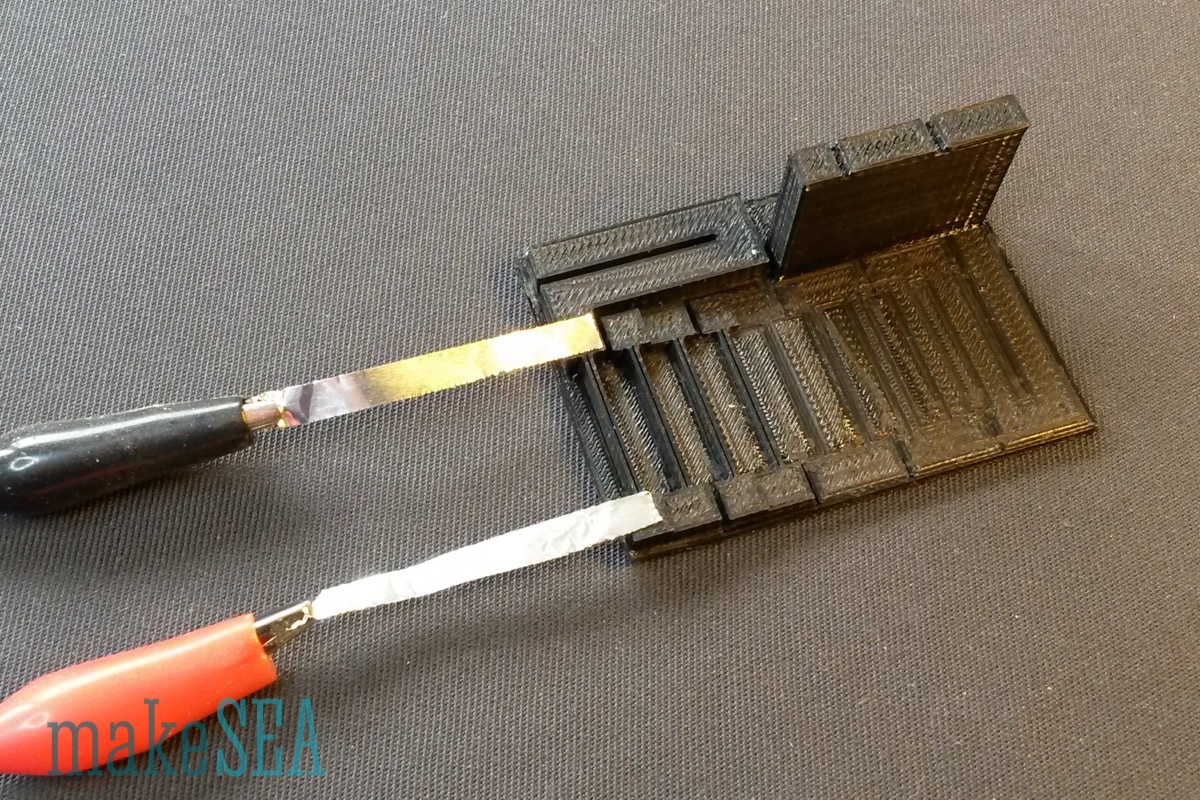 |
The regular probes have only a small contact-area (almost only a point), and due to the relative high resistance of the PLA I expected to see a relevant difference compared with larger contact areas. For better contact I was using aluminium foil, which I pressed with my fingers to the PLA surface. I know, my body is also a resistor, and it could influence the results, but my own finger-resistance was in the range of Megaohms - not relevant, if result is kOhms ...
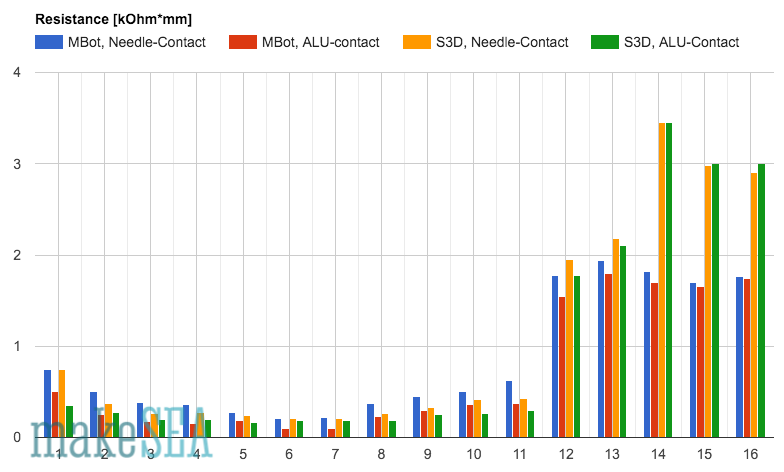
The chart shows the results from two printed models (one was sliced with original Makerbot software, the other was sliced with Simplify3D, both with similar parameters). And it shows measurements from 2 different contact types (explaned above). The measured values range from 1 kOhm to 10 kOhm for the horizontal oriented wires. Using cross-section area and conductor lenght, the specific resistivity could be calculated. Even dough my measurement methods were not very elaborate and accurate, it's clearly visible, that the printing orientation has a big influence: the resistivity horizontally along the slicing plane is much lower than the resistivity vertically across the slicing planes. Also visible the effect of contact area from the probes: for low Ohm wires the contact area can influence the resistance more than 50%, whereas for high Ohm conductors, it's less relevant.
The averaged values are in the range of the official Proto Pasta. The resistivity along z-axis probably depends also on the layer thickness (my prints have 0.1 mm layers).
| Resistivity Horizontal | 0.27 | kOhm*mm | official proto pasta: 30 Ohm*cm |
| Resistivity Vertical | 1.88 | kOhm*mm | official proto pasta: 115 Ohm*cm |
Conclusions:
1) Conductive PLA is useful for low-power applications (e.g. powering an efficient LED with a few mA)
2) Conductive PLA is difficult to use for "higher-power" applications (e.g. a microcontroller consuming more than 20 mA). Up to 20 mA the main problem isn't the resistance of the wire itself, because this can be designed with a large cross-section area. Problem is the contact area for a battery or the pin of the IC or any other current consuming device.
3) A bright flashlight with 1 W consumes roughly 300 mA. Assuming a minimal wire length of 20 mm. We don't want to loose more then 0.5 W over this wire. Let's calculate: R = P / I^2, and Area = Resistivity * Length / Resistance => Area needs to be more than 900 mm^2, if the wires have a square cross-section, the wire witdh needs to be 30 mm. In order to avoid additional losses the contact area from battery and LED has to cover the full cross-section. No useful application!
4) Avoid vertical oriented wires: having a closer look at the resistivities 14, 15, and 16 in the chart above, there is a significant difference between the prints sliced by Makerbot software and S3D. When inspecting the printed object, I realized that one of the higher layers from the S3D-print has a strange inconsistency (maybe underextrusion, or ambient temperature-change). Anyway in 3d-printing it's more likely that something goes wrong along the z-axis compared to the xy-axis, and the impact on the resistance can be huge.
3D-Model:
- SETP
- F3D
While I was wating for the conductive PLA beeing delivered, I already started creating some desigs for testing. I was also interested to see, how the material can be used for printing a coil:
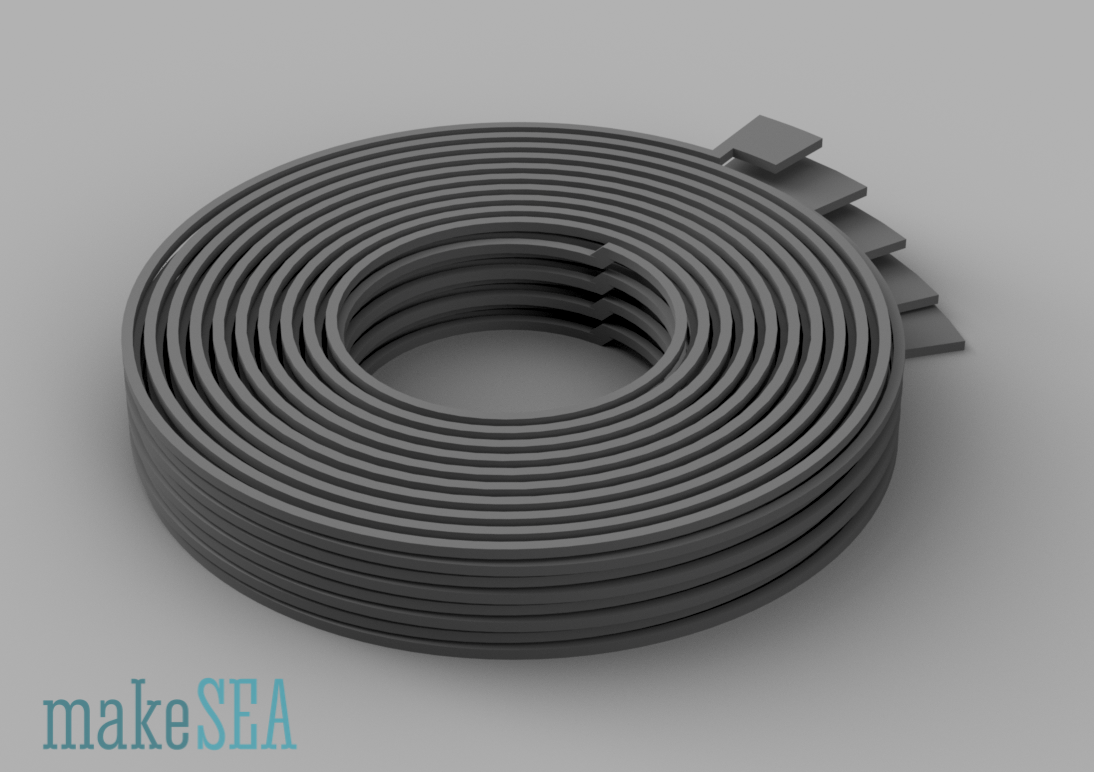
I've not yet printed it, because I expect inferior usability due to the high resistance. Here are some numbers:
| Outer Diameter | 50 | mm |
| Inner Diameter | 20 | mm |
| Height | 10 | mm |
| Cross-Section | 0.49 | mm^2 |
| Resistivity | 0.3 | kOhm * mm |
| Wire Length | 8'000 | mm |
| Turns | 80 | |
| Resistance | 4'898 | kOhm |
| Current | 0.001 | mA |
| Voltage | 5 | V |
| Inductance | 180 | uH |
(using http://coil32.net/online-calculators/multilayer-coil-calculator.html for inductance calculation)
In order to create a small magnetic field, there needs to be a certain amount of current. However the resistance is incredible high (5 Mega Ohm), and with 5 Volts there is only 1 Microampere Current. This design is not usefult as a magnetic actor! Probably there is no design, where the conductive PLA from Proto Pasta can be used as actor (motor). The resistivity would need to be MUCH smaller!
Maybe there is an application as sensor? Maybe I should give it a try to print this design at some time.
Conductive PLA sourced from:
